How to use a spatial Finder in OS X
One common gripe for the Mac old-timers is the switch from the 'Spatial Finder' of OS 9 to the 'Browser-style Finder' of OS X (pioneered in Windows 95). You can relive the old days now in Snow Leopard with this tip.
As a bit of background: OS 9 treated displayed each folder’s contents only once on screen, and always in its own window, and always in the same place on-screen. This was done to mimic the real life desktop and folder paradigm. OS X follows a more web-like paradigm, where each Finder window can be used to view any folder’s contents, and a single folder can be viewed simultaneously in multiple windows.
However, you can relive the old days of OS 9’s spatial Finder by turning off the sidebar and toolbar. To do this, click the capsule-shaped button in the upper right of a Finder window. Once the sidebar is gone, opening folders will act like they did in OS 9: opening into their own windows.
Note, it’s actually possible to have both OS 9-style folder windows and OS X-style browser windows open at the same time.
This behavior isn’t new in Snow Leopard; it works the same way in 10.5. Also, if you use column-view mode, this hint doesn’t work; it only applies to opening folders when using icon or list view modes.
Automatically zoom new pages in Safari
Safari has a nice feature to zoom in (or out) on a webpage, which is great for large monitors. Unfortunately, you’re not able to set a default zoom level for new pages. CSS hacks exist, but zooming via CSS doesn’t seem to work as well as the native zoom function in Safari. The AppleScript in this hint zooms in on any new web page using Safari’s own zoom function.
The script is quite a hack -- it checks every tenth of a second to see if the currently active tab isn’t zoomed in. If it’s not zoomed in, the script activates the corresponding keyboard shortcuts to zoom the page. You can edit the script to change how often the zoom-check should be made, and what level of zoom should be made.
repeat
  try -- we have to try, since safari might not be running, and theUrl might not be defined
    if frontmost of application "Safari" then
      tell application "Safari"
        set theUrl to URL of current tab of window 1 -- window 1 is apparently always the active window in Safari
      end tell
      if theUrl is not "" then -- this will ignore new tabs where a page is not yet loaded
        tell application "System Events"
          tell process "Safari"
            -- these may differ according to the OS X language
            set activeMenuItem to enabled of menu item "Actual Size" of menu "View" of menu bar item "View" of menu bar 1
          end tell
          if not activeMenuItem then
            -- here we fire off the key shortcuts
            -- these may differ according to the OS X language
            keystroke "+" using command down
            keystroke "+" using command down
          end if
        end tell
      end if
    end if
  end try
  delay 0.1 -- how many seconds to wait until next check
end repeat
With a delay of 100ms, the scripts gobbles 1% of the CPU time on my system. One idea is to make an application from the script, and launch that instead of launching the script directly from the AppleScript Editor. Any suggestions for improvement are welcome!
It tested in 10.6.2 on a MacBook Pro, and the script used about 5% of the CPU. It did, however, work as described.
Lock your Mac Desktop with the Locker Widget
Locker is a very simple Dashboard widget that does something Mac OS X should have included by default, it instantly locks your Mac desktop. All you have to do is open your Dashboard and double click the Locker icon and you’ll end up at a login window where you need to enter a login and password to regain desktop access. The uses for this are many, but I am still surprised Apple does not provide a simple way to lock your Mac outside of either a screensaver or fast user logout with Shift-Command-Option-Q. Anyway, check out Locker, it’s no frills and gets the job done.
Create a size-limited playlist of random albums in iTunes
If you like to listen to complete albums, but cannot fit your entire library on your iPod, create a Smart Playlist that contains a random selection of entire albums.
First, in iTunes, turn on Shuffle with the Controls » Shuffle » Turn on Shuffle menu item. Select the Shuffle menu again, and check Shuffle by Album. Next, create a new Smart Playlist with these conditions:
- Match the Rule 'Media Kind' is 'Music'
- Limit to 7GB selected by random (i.e. for an 8GB iPod)
- Check 'Live Updating' to update the Random Album Playlist by selecting and deleting albums in the Playlist
Use quotation marks with Spotlight to search for a phrase within a document

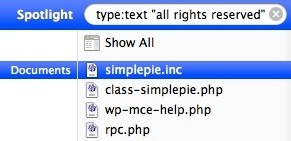
If you know a phrase that is contained within a document, but can’t remember the document file name, try searching for the phrase that you know appears within the document. Make this phrase search even more precise by putting the phrase itself within quotation marks, for example “all rights reserved” will find all files that contain that exact phrase only.
Change the Dock item click-and-hold behavior in Snow Leopard
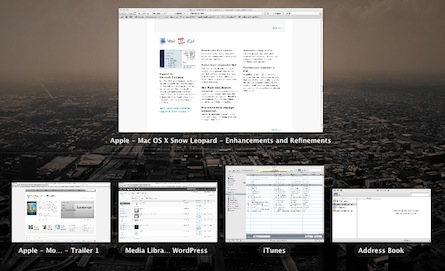
Snow Leopard changed the way the Dock behaves when a Dock item has been clicked on and held down, since 10.6 it launches Expose for that specific application. You may recall how Leopard handled the click-and-hold though, which was to launch the contextual menu (the same one you get when you right-click in 10.6). Using the Terminal and the defaults write command, you can alter this behavior between the 10.5 contextual-menu and 10.6 Expose style click-and-hold Dock behavior. So launch your Terminal:
Show contextual menu rather than Expose when Dock item has been clicked and held (like 10.5)
defaults write com.apple.dock show-expose-menus -bool no; killall Dock
Revert to Expose upon click-and-hold (10.6 default)
defaults write com.apple.dock show-expose-menus -bool yes; killall Dock
I actually like the new Expose click effect (which is slightly different in 10.6.2 than it is in 10.6), so for me this is a matter of “If it ain’t broke, don’t fix it” but to each their own.

via Lap Cat Software
Run screen savers on top of the login window
As many people may know, Apple made it all but impossible to run any screen savers on top of the login window (i.e. after some time, a screen saver appears over the login window) in Leopard by tightening up security requirements on processes that can run over the login window via launchd. This made workarounds that worked prior to 10.5 impossible to use. (The only screensaver that can run behind the login window in 10.5 is this one.)
I’m happy to report that, as of Snow Leopard, running screen savers behind the login window is finally officially supported. This was brought to my attention by magnusviri in this Apple Discussions thread .
Here is how to make it work...
Use Property List Editor or TextWrangler to create the file /Library » Preferences » com.apple.screensaver.plist with the following content:
<?xml version="1.0" encoding="UTF-8"?>
<!DOCTYPE plist PUBLIC "-//Apple//DTD PLIST 1.0//EN"
"http://www.apple.com/DTDs/PropertyList-1.0.dtd">
<plist version="1.0">
<dict>
  <key>loginWindowIdleTime</key>
  <integer>180</integer>
  <key>loginWindowModulePath</key>
  <string>/System/Library/Screen Savers/Nature Patterns.slideSaver</string>
  <key>moduleDict</key>
  <dict>
    <key>moduleName</key>
    <string>Skyrocket</string>
    <key>path</key>
    <string>System/Library/Screen Savers/Nature Patterns.slideSaver</string>
    <key>type</key>
    <integer>0</integer>
  </dict>
</dict>
</plist>
The loginWindowIdleTime time interval is in seconds. You can use any default (OS X-provided) screensaver from /System » Library » Screensavers.
Interestingly, this file does need not to be owned by root, so it can be created by an admin user without entering an admin password. This might be construed as a security weakness. However, I was not able to make this work with any third-party screen savers, even when I placed them directly into /System » Library » Screensavers (which does require an admin password).
If somebody does know how to make this work with third-party screen savers, please post in the comments.
If you wish to use other screen savers, first set the desired screen saver in the Desktop & Screen Savers System Preferences panel. Then go into your user’s Library » Preferences » ByHost folder, and open the file com.apple.screensavers.RANDOM_TEXT.plist. Copy and paste the relevant lines from that file into the above file -- all the entries in the <dict> section, plus you’ll need to replicate the path key’s string into the loginWindowModulePath key. I tested this, and it works -- the Arabesque screen saver now runs after 30 seconds of login window display.
by macosxhints.com