iTunes Power Tips Every Mac Owner Should Know
Your quick-and-dirty guide to the world's most popular digital media app.
It’s been more than eight years since Apple released the first version of iTunes. And although it’s expanded to incorporate many smart features since its January 2001 debut, it still looks remarkably similar to the way it did when it first appeared, running on OS 9. Back then it was just a jukebox, but over the years came enhancements like CD burning, the iPod, smart playlists, the iTunes Store, video support, and, most recently, the iPhone.
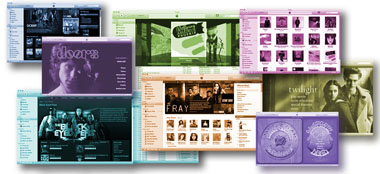
Apple has gradually turned iTunes into a hub for managing and playing all the music and movies on your Mac and mobile devices, while continually adding support for new devices and services like the Apple TV, movie rentals, and much more. In 2003, Apple made the smart move of developing a Windows version of iTunes, opening up the iPod market and the iTunes Store to a much wider audience. iTunes remains one of Apple’s most important applications, and it’s capable of far more than just playing music.
Whether it’s converting movies to watch on your iPod, building party playlists, getting album art online, buying music, renting movies, or backing up your iPhone, there’s an awful lot under the surface--and even more than ever with the release of iTunes 9 in September. Many of the tips and tricks we show you throughout this feature will save you time and even reveal a few things you didn’t know you could do.
Master Your Music
Take control of your music collection with these time-saving tips and tricks.
Use smart playlists to manage music on the fly.
Apple introduced smart playlists in iTunes 3, and it’s one of those features that, once you make using it a habit, you’ll never go back to plain-vanilla “dumb” playlists again.
To create a smart playlist, go to File > Smart Playlists (or press Option-Command-N). You’re presented with a dialog in which you’ll set the “rules” for your smart playlist. When you’re first starting out, it’s best to keep it relatively simple. But once you have the hang of it, you can go bigger, creating much fancier smart playlists to capture only specific types of content, weed out other content types, and so on.
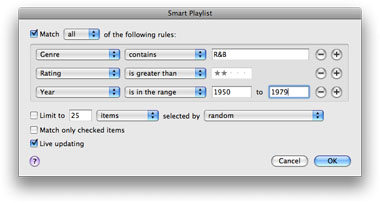
Smart playlists take the manual drudgery out of creating dynamic playlists out of iTunes media libraries of any size--and they're not limited to music.
If you specify that the playlist should show all songs with the Artist tag “Rolling Stones,” for example, all tracks in your library by the Stones will appear in the playlist. You can go a step farther and add all Rolling Stones tracks that have certain star ratings. By using the Match Any Rule option plus other options, you can have playlists that display different sets of tracks--a playlist, for example, where the genre is both blues and rock, as well as a bit rate greater than 128kbps. Be sure to check Live Updating, so iTunes will watch the library and automatically add any new files that meet the criteria you’ve specified.
Use Genius to find new music--or rediscover music in your library.
With more music than ever available in the iTunes Store, it can be time-consuming to find new artists and albums you might like. The Genius feature in iTunes sends information about your musical tastes to the iTunes Store and recommends new music based on similar artists and other people’s listening habits (if you haven’t already, you need to turn Genius on by choosing Store > Turn on Genius). If you select a track from your library and click the Genius button in the lower-right corner, iTunes will create a list of recommended albums and tracks that you can buy from the iTunes Store to complement your chosen track. Then you can preview and buy these songs directly from the sidebar. Since it knows what music is already in your library, Genius won’t recommend anything you already have.
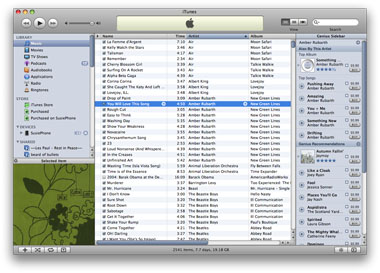
By activating the Genius feature you can have iTunes recommend new music based on your listening habits.
With iTunes 9, Apple expanded Genius to include mixes using songs already in your iTunes library. To get the Genius Mixes feature to appear in iTunes 9, turn on Genius if you haven’t already, then update Genius by selecting Store > Update Genius. Now, to see what Genius Mixes iTunes recommends for you, click Genius Mixes in the left-hand pane (under Genius) in the iTunes window. You’ll see a grid view of album cover-style graphics. When you mouse over one, you’ll see a name for the mix and a brief explanation of what it’s based on--for example, “Rock/Pop Mix 6: based on: The White Stripes, Weezer, Red Hot Chili Peppers & others.” Mouse over each mix and click the Play button to hear the mix. We just wish that once the Genius Mixes are created you could do more with them than just sit and listen--once a mix starts playing, there’s no way to tell what song is coming next. And, most frustrating of all, there’s no way to capture the mix as a regular or smart playlist.
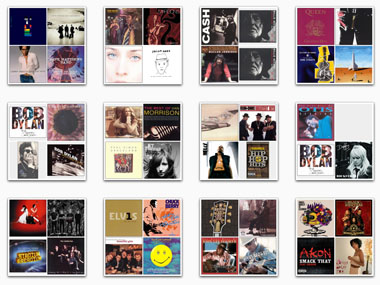
Genius Mixes in iTunes 9 auto-create mixes using songs in your own library on the fly.
Share iTunes libraries.
You can duplicate an entire consolidated iTunes library by simply copying the Music folder on your Mac. But with libraries frequently running into many gigabytes in size, this is a slow, inefficient method. iTunes can share your library over a local network, so it can be accessed by anyone on your Ethernet or wireless network. Go to Preferences > Sharing and turn on sharing of the whole library or specific playlists. You can password-protect access and also tell iTunes to look for other shared libraries. Since the music is streamed--not copied--it takes up no disk space on the machines of those who tap into your library.
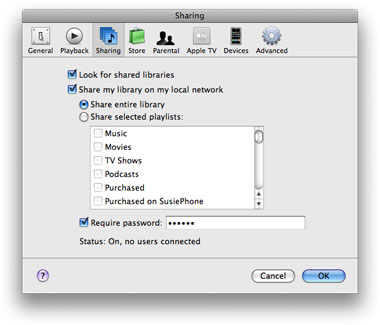
iTunes can share selected playlists or your whole library, including videos, over a local network, with optional password protection.
Automatically rip and import music CDs.
Go to Preferences > General and select “When you Insert a CD, Import CD and Eject.” As long as this setting is active, whenever you insert an audio CD, it will capture track names, encode tracks based on your import settings, and your Mac will then eject the disc. Next click the Import Settings button and choose the quality setting you want iTunes to use to convert the CD tracks as it imports them (192kbps AAC or MP3 files will offer good sound quality at reasonable file sizes). When you insert an audio CD, iTunes will now retrieve all track names and artwork from the Internet and import the tracks using the quality settings you chose.
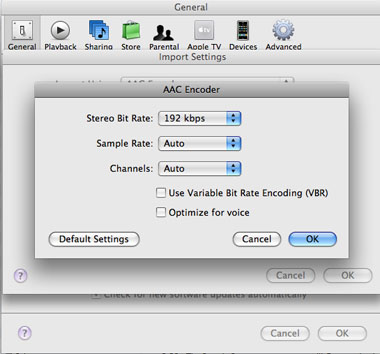
To set the bit rate for the AAC encoder, in the Import Settings dialog, choose 192kbps, leave the other options on Auto, and click OK.
Video Tips: What You See is What You Get
iTunes is just as good with video as it is with music.
Manage playback settings for the best viewing experience.
iTunes can display videos from your library in many ways. If you go to Preferences > Playback, you can tell it to play back videos in the small artwork viewer, in iTunes’ main window, in a separate window, or in full-screen mode. You can have anything from a small, unobtrusive window to a full theater presentation, blanking out additional displays. When it’s in a floating window, video can be resized during playback, and if you right-click, you can select any preset size. If you have more than one screen, move the floating window onto the display you want to use as the main screen. This is handy if you have a digital TV connected as a second screen.
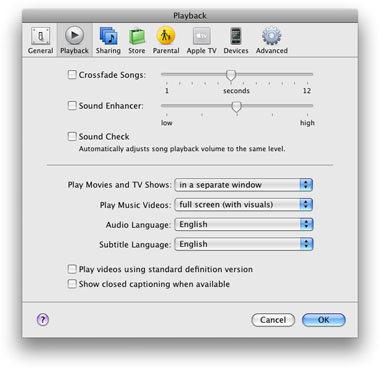
Use the Playback settings to control how video screens are arranged on your main monitors or multiple displays.
Convert video for playback in iTunes & on your iPod.
iTunes is picky about what video file formats it can read and play back. It doesn’t like AVIs, WMVs, or other non-Apple formats, for example. If you have a movie that’s already been digitized into one of these incompatible formats, the best course of action is to convert it with QuickTime Pro ($29.99, www.apple.com/quicktime) into an MP4 or M4V file using the File > Export > MP4 or Apple TV options. You will also need to install Perian (free, www.perian.org) to enable QuickTime to open the videos in the first place. You should be able to drag the converted movies into your iTunes library, holding down the O key if necessary to override automatic copying of the file. Then choose Advanced > Create iPhone, iPod, or Apple TV version, and iTunes will convert the video using the optimum quality and screen-size settings for the device that you plan to view the video on.
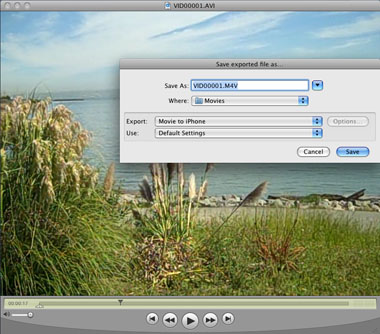
Combining QuickTime Pro and Perian, you can convert video formats that iTunes doesn't favor (such as .AVI) to .M4V files, so you can watch them on your Mac, iPod, iPhone, or Apple TV.
Export your home movies to your iPod or iPhone.
If you use iMovie ’08 or ’09, you can export a project directly into iTunes using the Share menu. Or, choose Media Browser and check the iPhone and iPod options. For each option you check, a different version will be compressed and exported.
However, if you’re still using iMovie HD 6 or your movie has come from another source, such as straight from a camera, you can use a third-party compression tool like ffmpeg (homepage.mac.com/major4/) to convert most kinds of video files.
If you have QuickTime Pro and Perian installed, you can opt to export directly for iPhone, iPod, or Apple TV within QuickTime Pro.
How to Digitize Your DVDs
There are, of course, legal issues with ripping a commercial DVD. To keep the feds off your back, only use this how-to for digitizing a commercial DVD movie or other content that you have purchased. This, according to the MPAA, is legal. Making 100 copies of I Love You, Man and selling them for $5 each at your cousin’s garage sale--not so much.
Before you start, download and install Handbrake (free, handbrake.fr) and VLC (free, www.videolan.org/vlc).
1. Get to the source.
Load the DVD into your Mac and launch HandBrake. The software needs you to select your video source. Navigate to your DVD and select it. Now it should appear under Source.
2. Get inside the source.
HandBrake doesn’t make it easy to figure out which file on the DVD is the movie. In the Title section in the main interface, you get a pull-down menu showing the available files on the DVD. The files are identified by time length, so if you’re ripping a movie, you’ll probably want to select the file with the longest running time. (It can get tricky if you’re ripping a DVD with a commentary track or extra features that run the same length as the featured video.) If you’re selecting a TV show, look for running lengths of about 24 to 45 minutes. Under Destination, pick a place where you want to save the converted file.
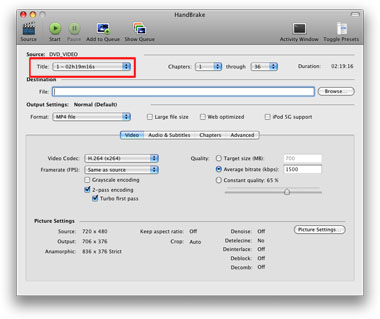
We identified our Lawrence of Arabia movie file by its length of 2 hours, 19 minutes, 16 seconds.
3. Output settings.
If you want to convert a video for iPod, iPhone, or Apple TV, you can use one of HandBrake’s presets. Click the Toggle Presets button at the upper-right to open the Presets window (if it’s not already open). To create a video to play on your Mac, select QuickTime.
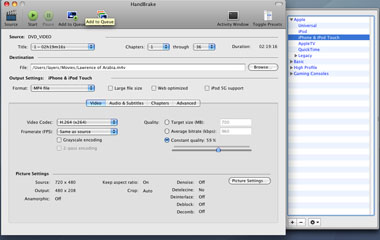
We're taking a cross-country plane trip and plan to watch Lawrence on our iPhone to while away the hours in flight.
4. Tweak video and audio settings.
The bottom half of HandBrake’s main window lets you make adjustments to the video settings. For example, lowering the frame rate can help reduce the file size. The Quality settings also influence file size. If you select a target size, HandBrake will rip the video based on your setting; the smaller the setting, the lower the video quality. If you go with an average bit-rate setting, enter a setting between 400 and 600 (though you can go much higher or lower if you want). Constant quality reduces the quality based on a percentage. Click on the Picture Settings button to adjust the pixel size of the video.
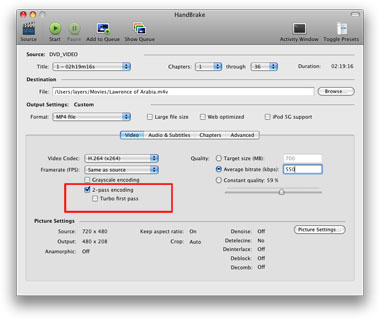
Selecting 2-pass encoding will improve video quality, but it takes longer to create the file.
Click on Audio & Subtitles to tweak the audio settings. Make sure the language you want is selected in Track 1. You can also adjust the sample rate, bit rate, and activate subtitles.
5. Hurry up and wait.
When you have your settings settled, click on Start, and go do something else. It can take a while to rip a DVD. Fortunately, HandBrake is a Universal application, so Intel Mac folks will get much faster results. Lawrence of Arabia took 1 hour, 12 minutes to rip on a 2.33GHz Intel Core 2 Duo MacBook Pro with 4GB of RAM.
6. Drop into iTunes
When HandBrake is done, navigate to where you saved the file. Drag and drop the file into iTunes, then connect your iPod, iPhone, or Apple TV, and sync. iTunes will transfer the file to your device. Or, if the movie was converted for your Mac, just double-click the file to watch it.
Sync and Swim
Better ways to manage music, video, and apps between your Mac and your iPod or iPhone.
Manage apps on your iPhone or iPod touch.
Hallelujah--iTunes 9 brought the option to more effectively manage which Home screen’s apps appear on your iPhone or iPod touch. Now when your device is connected and you select it in the sidebar, click the Applications tab to see a visual representation of where app icons will appear on the 10 possible Home screens. Although we’d love to see the option to name each screen rather than having them be numbered, the new management option is miles ahead of the old way of doing things.
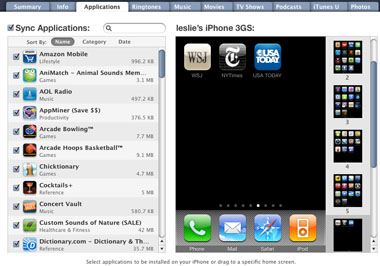
We created a screen just for the news apps we use most.
Automatic syncing saves time and space.
iPods and iTunes have always had the ability to automatically sync with each other--sharing exactly the same music files. For some this is great, as it maintains an exact copy of your music, photos, and contacts on your iPod or iPhone and on your Mac. Others, though, prefer more flexibility. With your iPod selected, go to its Summary tab and click Manually Manage Music and Videos. Then you can add or delete tracks from the iPod’s music library by hand. Just drag and drop tracks from your iTunes library to add them.
In each subsequent tab you can choose to manually sync contacts, calendars, ringtones, videos, applications, and more. This is a great way of syncing some data without performing a full sync, which can be slow and puts you at risk of accidentally overwriting data.
Use Senuti to get music from an iPod to your Mac.
Being able to copy songs from an iPod to a Mac is incredibly useful, and no, we’re not talking about pirating. If you keep distinct iTunes libraries on more than one Mac, your iPod can carry them back and forth. If your hard drive crashes, or you get a new Mac, restoring iTunes tracks via an iPod is a great trick to have at hand.
FadingRed’s Senuti ($18, www.fadingred.com) lets you do exactly this--a simple operation you’d think iTunes would allow but doesn’t.
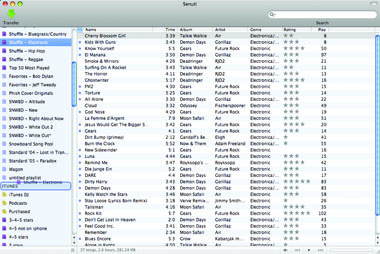
You can drag not only songs and videos, but whole playlists, right to your iTunes library.
Senuti supports the iPod touch and iPhone, as well as all the iPods. When you connect your device, its library and playlists appear at the top of the sidebar, while your iTunes library and playlists are listed on the bottom. Blue dots next to the tracks show you which songs on your iPod already exist in iTunes. Drag songs from your iPod’s library and drop them onto your iTunes library, or select songs and click the big green Transfer button. Senuti can copy the songs anywhere on your hard drive for you to back up, or it can even add the songs directly to iTunes--just choose iTunes Music Folder as the default download location in Senuti > Preferences.
Senuti can also rebuild playlists from your iPod in iTunes. Smart playlists on your iPod become regular playlists in iTunes, however, preserving the list as it was on your iPod, without adding in more qualifying songs from your iTunes library, as a smart playlist would. To copy a playlist to iTunes, you drag the whole playlist name from the iPod area of the sidebar and drop it on top of the word iTunes in the bottom half of the sidebar.
Pump up iTunes with AppleScripts
We have long been fans of Doug’sAppleScripts for iTunes, a huge--and we do mean huge--catalog of AppleScripts created by Doug Adams and available to the iTunes-loving masses for free at dougscripts.com/itunes.
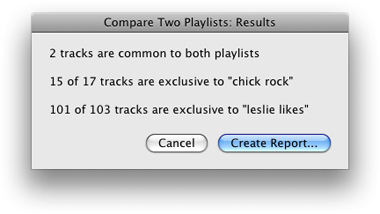
You can laugh, but we would never have taken the time to manually compare the similarities of these playlists. Thanks, Doug's Scripts!
One particularly useful script--though it’s very hard to pick just one--is the Compare Two Playlists script, which compares the contents of two playlists and creates a text file on your Desktop listing the tracks they have in common and the ones that are exclusive to each. This comes in handy if you make a lot of playlists for parties and want to easily tell them apart. Download the script, unzip it, and copy the scripts to the your username\Library\iTunes\Scripts folder, creating the Scripts folder if necessary, as directed in the instructions.