Apple hires former YSL CEO Paul Deneve to work on special projects under Tim Cook

Confirming a claim from earlier today, Bloomberg‘s Adam Satariano reports that Apple has confirmed the hire of former Yves Saint Laurent CEO Paul Deneve. According to Apple, Deneve will report as a Vice President to Apple CEO Tim Cook. Yves Saint Laurent is a high-profile global fashion brand and retailer.
Contrary to earlier speculation, Apple says that Deneve will work on “special projects,” not in retail. Apple has been without a de-facto Head of Retail since John Browett’s departure last fall. It is unclear what projects Deneve will be developing specifically…
Apple is rumored to be working on wearable computers, so perhaps the new executive will be offering a fashion perspective for these devices. Notably, according to biographies of Deneve, the executive worked at Apple for several years prior to his most recent position at Yves Saint Laurent. He is also apparently an advisor to Silicon Valley startups.
WebGL for IE11 will enable Bing Maps 3D

Among the number of announcements Microsoft made at last week’s Build, two stand out not only for their significance, but for their relationship. For the first time, Microsoft is including the open-source graphics rendering javascript API known as WebGL, and at the same time, re-introducing Bing Maps 3D. How are they connected? Let’s take a look.
First, some background. Microsoft has never included WebGL with Internet Explorer, even though it is an important part of other major browsers. In fact, Microsoft took the time, back in June of 2011, to explain just why they considered WebGL “harmful” (short answer, security vulnerabilities).Microsoft had just “killed” Silverlight a few months earlier at PDC 2010, and web developers weren’t left with many choices for their graphics intensive applications: an immature HTML5, Flash, or ignoring IE and going with WebGL.
Microsoft didn’t spend a lot of time in the Build keynote or in the IE 11 blog post talking about WebGL, only including a single paragraph in the blog post:
【Hardware-accelerated 3D Web graphics. Interoperable WebGL experiences run on all devices, taking advantage of GPU acceleration. IE11 scans for unsafe WebGL content and implements a software-based renderer to complement the GPU. With Windows, graphics subsystem failures are not fatal, and WebGL continues to run. With IE11, your 3D experiences can access device orientation to create new interaction opportunities for immersive Web content.】
However, in a session run by Frank Olivier, Build attendees did get a deeper dive into IE’s implementation of WebGL (including a quick sneak peek at PhotoSynth 2, which occurs right at the beginning of the session and is well worth a look):

As Olivier says in the session, WebGL offers developers the chance to do “stuff you can’t really do anywhere else on the web platform”.
On to Bing. At the Build Day 1 keynote, Bing VP Gurdeep Singh Pall showed off (alongside a number of other cool new features coming to the Bing Developer Platform), an upcoming set of controls for Bing Maps 3D:

Now just as a refresher, 3D maps aren’t anything new to Bing, they existed for years as at first a standalone download known as “Virtual Earth 3D“, and then later as a Silverlight plugin to the classic Bing Maps, known as “Bing Maps 3D”. That was shut down in November of 2010, as Microsoft made a hasty retreat from Silverlight.
Intrigued by this offhand mention of a new incarnation of Bing Maps 3D, I asked around a bit. First, Bing Director Stefan Weitz told me that the new version was almost entirely built from the ground up, using, among other technologies, Microsoft’s UltraCam. There’s simply not much left from the old Bing Maps 3D, Silverlight or otherwise. Then I had a chance to talk a bit about WebGL with Jason Weber, a PM on the IE team, who has been at a number of Microsoft events presenting on Internet Explorer. He explained that Microsoft is using a custom implementation of WebGL, which sits on top of (well sort of) DirectX. In fact, WebGL and DirectX share a lot of functionality (although DirectX, of course, is not open source, and not used by any other browsers besides IE):

But it was after attending a Bing Developer session at Build, and talking to Bing Maps Senior PM Johannes Kebeck that it all started coming together. He told me that the new Bing Maps 3D would be coming not only to web developers in the form of Bing Developer controls for use in their apps, but also coming back to the web as part of Bing Maps. However, Bing Maps 3D is based on, you guessed it, WebGL.
For the Bing Maps team to do stuff they couldn’t do anywhere else (including Bing Maps 3D and PhotoSynth 2), they needed WebGL. It’s been nearly two years without a 3D mapping product from Microsoft, but now, finally with IE’s rebuilding of WebGL, we’ll be seeing some cool stuff not only from app developers, but from Bing Maps, as well.
How to Use Personal Hotspot on iPhone / iPad to Share Its Internet Connection
Personal Hotspot allows you to turn an iPhone or cellular equipped iPad into a wireless router, thereby sharing the devices internet connection with other Mac, PC, or any other capable hardware. Often called “internet tethering” or Wi-Fi Hotspot, this is an excellent feature for telecommuters and travelers in particular, and it’s also a great backup internet connection if a home or work network temporarily goes down. Plus, with the ever increasing range of LTE and 4G service, it’s not uncommon for a cellular connection to actually be faster than standard DSL or a cable modem anyway.
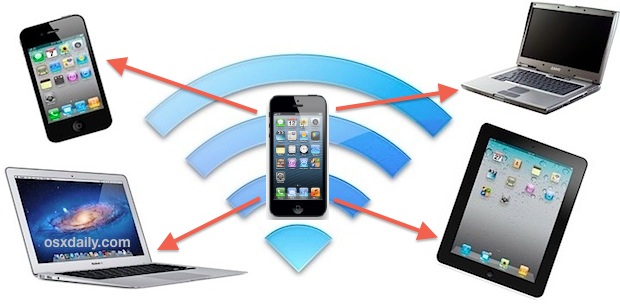
The only real requirement for using Personal Hotspot, other than an iPhone or 4G/LTE iPad, is a cellular data plan that offers the service. Fees vary per provider and per area, so you will need to check with your specific carrier if you are not sure what it costs or how to order the feature for your data plan.
Using Personal Hotspot to Share the iPhone or iPad Internet Connection
Here’s how to turn on internet sharing and turn an iPhone or LTE iPad into a router:
- Open Settings, then tap “Personal Hotspot” and toggle it to ON
- Optional but highly recommended: Tap on “Wi-Fi Password” to set a new custom wireless password to access the device through wifi
- From the Mac, PC, or other iOS device, choose the newly created personal hotspot as the wireless router, typically it’s named “iPhone” or “iPad”, or whatever the name of the device is set to
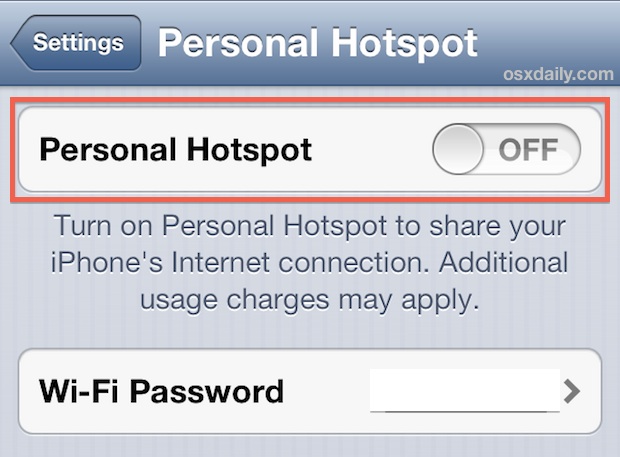
Yes it’s that simple to use. Whatever device becomes connected to the iPhone or iPad will treat it as a normal wireless router and use it’s internet connection as usual, never knowing the difference. The iPhone/iPad will display a blue status bar indicating Hotspot is on and devices are connected to it’s internet connection.
Connecting through wi-fi is by far the easiest way to use the iOS devices internet service, but you can also connect through Bluetooth if desired, which is often slightly slower, or through a tethered USB connection, which is often the quickest and has the advantage of also charging the iPhone or iPad, but it’s disadvantaged by the physical USB attachment between the devices. Most carriers place a five device limit on Personal Hotspot use, so be aware of that and don’t try to provide the entire officer neighborhood with an internet connection through your cell phone.
When you are finished using the iPhone/iPad internet connection, go back into Settings and toggle Personal Hotspot back to OFF. This will stop broadcasting the wi-fi and Bluetooth signal as a hotspot, and also save some battery life.
Why isn’t “Personal Hotspot” showing up on my iPhone or iPad?
Don’t have the Personal Hotspot setting on your iPhone or cellular iPad? There’s a few possible reasons for this. First and foremost, not all carriers support the feature, so you will want to be sure that your cell provider does offer personal hotspot and internet tethering. Many carriers will either charge an additional fee to use the hotspot ability, or require a separate data plan in order to use the feature.
On the other hand, if you know for sure that you do have support for internet sharing on your iPhone or iPad with a data plan to support it, but Personal Hotspot has mysteriously disappeared, you can often just reset the devices network settings to bring it back into the Settings menu. Then just flip it on again as usual to get going.
Watching Personal Hotspot Data Usage
Once you tether a computer to an iPhone, iPad, or Android, you may be surprised how quickly you can eat up the data plan, so don’t try to do anything too crazy like download a movie or large file, it’s best to conserve cell data and use it cautiously. Because each cell provider charges different rates and fees, be sure you know what the overage charges are, and if you suspect you’re going overboard then just jump off the hotspot so you can reign things in. Perhaps the best way to monitor data usage when tethering and using Personal Hotspot is by keeping a close eye on the data counter on the device itself. Here’s how to check this in iOS:
- Open Settings, go to “General”, then go to “Usage”
- Scroll down to “Cellular Usage” and look under “Cellular Network Data” to see a live count of network use
Until you get an idea for how much data you use in an average hotspot session, it can be very helpful to tap the “Reset Statistics” setting at this menu each time you start a tethered or personal hotspot session, that way you can know exactly how much data is being consumed.
You can take further steps to conserve and reduce data usage when connected to Personal Hotspot, we cover 10 excellent tricks here to help keep data usage low when tethering to an iPhone or iPad, and they range from disabling automatic updates for a variety of apps and OS’s, to turning off cloud and Dropbox syncing.
Don’t have an iPhone or iPad? No big deal, because Android can also do this and share it’s internet connection easily too. The same data usage rules apply for Android though, so always remember to keep an eye on your data plan regardless of way device is being used.
Recover a Lost Encrypted Backup Password for an iPhone, iPad, & iPod touch

iOS devices can use an optional encrypted backup feature that protects all backups with a strong encryption layer and password, meaning those backups are both unusable and unreadable without that password. If you chose to encrypt the backups of an iPhone, iPad, or iPod touch with such a password and then somehow forgot the password to those backups, you may have an option available to recover it and then regain access to those backups for recovery and general usage. This is not guaranteed to work for everyone because it depends on the usage of Keychain in Mac OS X, which not everyone uses, but it should be the first thing to check if you wind up in such a situation either yourself, or when troubleshooting someone else’s missing encrypted backup password. In most cases this must be done on the computer that the backups were made to, unless the user had enabled iCloud Keychain, which it would then be possible on any machine using the same Apple ID. Either way, here is what needs to be done to attempt to recover a lost encrypted backup password:
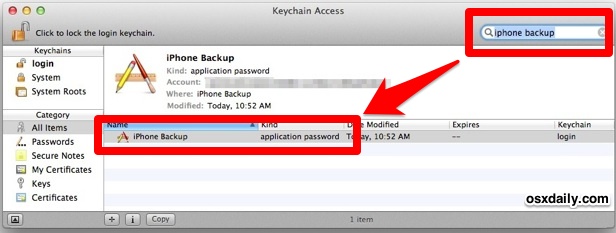
- Open Keychain Access, found in /Applications/Utilities/
- Use the Search box in the upper right corner and type “iphone backup”
- Double click the result, assuming something is found in Keychain
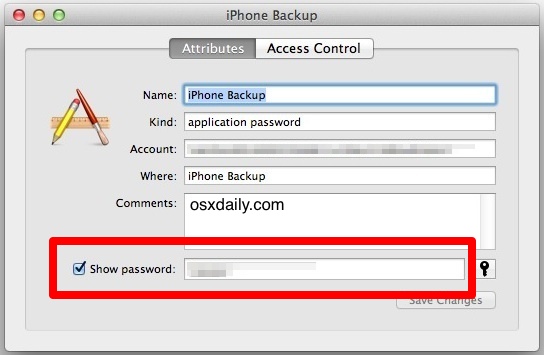
- Check the box next to “Show password” and enter the Mac administrator password to reveal the lost password associated with the encrypted iPhone backup
- Make note of the password, then close out of Keychain Access
Now you can go back to iTunes and use that recovered password to use the encrypted backup through the normal restoring from a backup process.
If nothing related to the iOS backup shows up in Keychain Access, you’re kind of out of luck in terms of accessing the encrypted backups unless you can somehow guess their password. The encryption is extremely secure (as it should be), and thus can’t be circumvented in any reasonable manner that is available to a human.
What if there is no password recovery option for the encrypted backups?
If the above trick doesn’t reveal the backup password, it doesn’t mean the iOS device is suddenly unusable, but it does mean that it must be used either in it’s current state, or reset to factory defaults and then set up as a new device without restoring from the encrypted backup, which basically treats it like a brand new phone. iCloud backups may still be available as well, as accessible through an Apple ID, but that’s also not guaranteed since not everyone uses the iCloud backup service.
It’s important to point out that this is specifically for accessing the password protected encrypted backups made from iTunes, and this is not going to have any impact on lost passcodes set on the device itself, or any other security measures that were taken to lock down the iPhone, iPad, or iPod touch, through a third party encryption service or otherwise.
Mirror Displays on the Mac with a Keyboard Shortcut
- Command+F1 is the mirror shortcut that works with all Mac keyboards
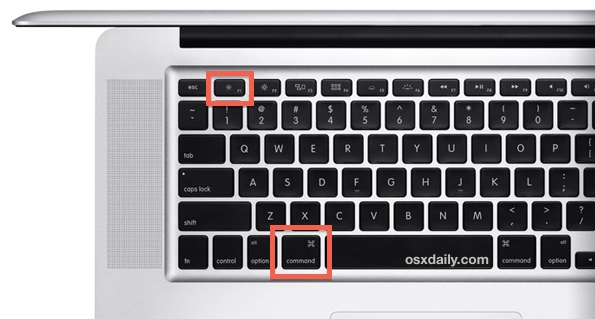
In order for this shortcut to work you will need an external display of any sort attached, then once hit hit Command+F1 you will see both displays briefly flicker bright blue and suddenly mirroring will be enabled.
This command works with quite literally any Mac, whether a MacBook Pro, Air, iMac, whether it’s using a built-in or external keyboard, and with any connected secondary display, from an external monitor, a TV, a projector, Apple TV through AirPlay Mirroring, whatever. Use this the next time you need to do a presentation, or watch a movie on a bigger screen, it’s super fast.

Something to consider with screen Mirroring is the resolution of the external display, which is often different from the resolution set on a MacBook Pro or Air. This means that some external displays, typically LED, LCD, and HDTV’s, will often not run at their native resolution, which leads to fuzzy looking images on that external display as it mirrors the native resolution from the Mac. Unless the Mac supports the same resolution, that’s hard to avoid with those screen types, but old fashioned CRT’s and any projector should be immune from those effects.
Do note that some Macs and keyboard layouts may require the usage of ALT+Command+F1 to get the Mirror toggle to work. If you continue to have trouble with the shortcut, or you’d rather have more general display options visible from anywhere, you can use a free third party utility that adds the Displays menu bar item back to Mac OS X.