Fix a file copy issue with SMB, XBMC, and Xbox(10.6)
Snow Leopard works pretty well for Windows File Sharing (aka SMB), but sometimes, clients can’t copy files larger than 2GB. My setup is Mac OS X 10.6.2 (desktop) with a bunch of EyeTV recordings, and an Xbox modified to run XBMC. OS X shares the recordings using Windows Sharing (SMB). Large recordings will abruptly stop playing at the 2GB mark. Oddly, these same recordings can be copied entirely to Linux clients, so it’s definitely the combination of XBMC and Xbox and OS X.
The problem is due to 64-bit locks on 32-bit filesystems. Take a look at /var/log/samba/log.smbd for messages like this:
posix_fcntl_getlock: WARNING: lock request at offset 49543704, length 65534 returned an Invalid argument error. This can happen when using 64 bit lock offsets on 32 bit NFS mounted file systems.
The easy fix is to edit /etc/smb.conf (or /private/etc/smb.conf; they’re the same thing) and at the bottom change these lines:
; Site-specific parameters can be added below this comment.

; END required configuration.
Into these lines:
; Site-specific parameters can be added below this comment.
[MyShareName]
    strict locking = no
; END required configuration.
Now turn File Sharing off and back on in the Sharing System Preferences panel. If you don’t know your MyShareName, take a look at /var/db/samba/smb.shares, because your entry must match what’s listed there.
Disable the Crash Reporter Dialog in Mac OS X
If you’re a developer (or anyone else) you may quickly get fed up with the Crash Reporter Dialogue box that pops up when an app melts down and crashes in Mac OS X. You can disable the Crash Reporter dialog box by launching the Terminal and entering the following command:
defaults write com.apple.CrashReporter DialogType none
and you can show the Crash Reporter again by entering the following at the command line:
defaults write com.apple.CrashReporter DialogType crashreport
It’s generally best to leave this kind of thing set to the default settings, and sending in crash reports actually helps Apple debug and improve software, but if you have a compelling reason to disable it, now you know how to.
How to use Facebook Chat with iChat
First, find your Facebook username by going to http://www.facebook.com/your_user/. Next, Open iChat, then select iChat » Preferences and click on the Accounts tab.
Click on the + (plus) sign to add a new account, with these settings:
- Account Type is Jabber Account
- Account name is
[email protected], and enter your password - Click the drop-down arrow to reveal Server options. Enter
chat.facebook.comas the server name. - Enter
5222as the port and click Done.
Click Done again, and you are good to go.
Kill OR Stop Flash the Flash with BashFlash or ClickToFlash
Kill the Flash plugin
It’s no secret, I hate Flash. It’s crass, it’s loud, it’s obnoxious, and on a Mac it is a literal drag on the machine, sucking up the CPU and memory as if there’s no tomorrow. Adobe really laid a pile of dung with Flash on the Mac, which is probably why Apple won’t allow Flash to run on the iPhone or the new iPad. here’s some solutions:

BashFlash is a little menubar extra that automatically warns you if Flash is taking up too many CPU cycles (usually is) and lets you kill the Flash culprit instantly.
The only bad thing about BashFlash is that it requires a 64 bit Mac, but this is because 64-bit Safari forces Flash to run within it’s own process ID on 64 bit systems, allowing BashFlash to target the resource hogging process and end it instantly.
BashFlash developer home
Download BashFlash now
Stop Flash loading

Although i hate Flash. It makes browsing the web painful, loud, and obnoxious. Really the only time I actually want to use it is on video sharing sites like YouTube, when using Flash is MY choice and not some obnoxious web advertisers with a “Congratulations… blah blah blah” talking Flash ad. Ok now that my rant is over, you can stop Flash from automatically loading by using an awesome Safari add-on called ClickToFlash, which allows you to only load Flash when you want to by clicking on a marked and disabled Flash region and manually enabling it yourself!
Are you sick of Flash getting in the way of your web experience? Download QuickToFlash and save yourself
Change the delay when dragging windows within Spaces

Spaces is a really nice feature of Mac OS X that lets you place different windows and applications within their own workspace. Dragging a window to a new Space is just a matter of holding onto the window and pulling it towards the end of the screen. You may have noticed that there’s a delay when dragging a window to a new space, which is handy for not accidentally dragging windows into a new Space but kind of annoying if you are expecting it to enter a new workspace instantly. The instant switching of workspaces is a lot closer to how these workspace managers, or ‘virtual desktops’ work in the Unix world, and if you have a background of using a Linux desktop you may miss that instant desktop switching. You can change the timing of Spaces switching rather easily though, using the Terminal.
Change the delay when dragging windows or applications within Spaces
Launch the Terminal and enter the following at the command line:
defaults write com.apple.dock workspaces-edge-delay -float 0.1
The number on the end represents the wait time, the default is set to 0.75 (or 3/4 of a second), so 0.5 is half a second, 0.1 is a tenth of a second, and so on. If you use the above command and 0.1 you’ll get a near instant switching of spaces.
If you want to revert to the default setting, just specify it as so:
defaults write com.apple.dock workspaces-edge-delay -float 0.75
Use a Service to toggle trash can off and on
This hint enables you to turn off (and back on) moving files to Trash when deleting files, thus deleting them immediately when the trash is off.
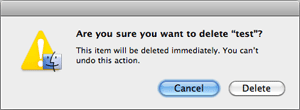
This hint takes advantage of the fact that if the .Trashes folder in a user’s home folder is not accessible, Mac OS X ignores it and displays an immediate file deletion warning like the one seen at right.
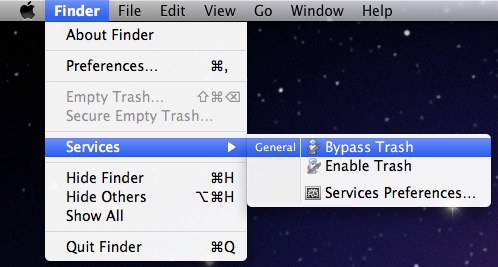
Create a service in Automator that (via the top two drop-down menus) takes no input and is available in any application. Add a single Run AppleScript action that has following contents:
on run {input, parameters}
  do shell script "chown root ~/.Trash" with administrator privileges
  do shell script "killall Finder"
  return input
end run
Save the service as Bypass Trash. Create another service with the same properties and one AppleScript action, with the following contents:
on run {input, parameters}
  do shell script "sudo chown myusername ~/.Trash" with administrator privileges
  return input
end run
Replace myusername with your short user name as defined in the Accounts System Preferences panel. Save this one as Enable Trash.
By running the Service in any application (Finder included), you can turn off (and back on) the Trash seamlessly. (Here’s what it looks like in action.) Do note that when turning off the Trash, Finder must restart so as to take notice of the folder ownership change.
Lock the Dock in Mac OS X
how to lock down the Mac OS X Dock, all of these commands need to be issued at the command line via the Terminal, so once you’re there enter the appropriate command:
Lock the Dock to Prevent Changes to Contents
defaults write com.apple.Dock contents-immutable -bool yes
Lock the Dock to Prevent Changes in Size
defaults write com.apple.Dock size-immutable -bool yes
Lock the Dock’s Position on the Screen
defaults write com.apple.Dock position-immutable -bool yes
After executing any or all of these commands, you’ll want to relaunch the Dock by killing it:
killall Dock
The Dock will reload itself and the changes will be in effect. Your Dock is now locked!
Why would you want to lock the Mac OS X Dock? If you’re a Systems Administrator or IT Technician, you can make your life a lot easier by having machines stay consistent. One good way to add to consistency across Mac’s is to lock down the Dock to prevent changes in it’s position, keep the contents in place, and to ensure that the size is the same. Now when you’re trying to remotely describe to someone how to open an application, you can be sure it is located exactly where you left it in the Dock.
Clear Finder’s Recent Folders list at shut down
I use the following method to automatically clean, at shut down time, the entries in the Finder’s Go » Recent Folders menu entry. It cost me some work, but eventually it worked. Open Terminal and do the following:
$ cd /etc/

$ sudo nano rc.shutdown.local
When prompted, enter your admin password. In the nano editor, add the following lines (assuming the file doesn’t yet exist):
#!/bin/bash
cd /Users/your_user/Library/Preferences/
defaults delete /Users/your_user/Library/Preferences/com.apple.finder FXRecentFolders
chown your_user:your_group com.apple.finder.plist
And now some explanation. your_user is obviously the short name of the user whose Finder preference file you want to edit. your_group is the group your user belongs to -- this is usually staff.
The chown command is needed because these commands are executed by the script as root. So the defaults delete command changes the ownership of the com.apple.finder.plist file, resulting in the loss of your Finder’s preferences at reboot. For the same reason, the commands specify the full path to files, because the script isn’t running as your user.
The rc.shutdown.local file does not need to be set as executable. It works like it is, but please remember to reboot twice after any change in order to see the effects.
To confirm your user’s group membership, you can use groups (which has technically been replaced by the less-obvious id -Gn, but still works in 10.6).
Modify default custom print settings in 10.5 and 10.6
This hint allow you to modify the default printing preset, that is, the preset selected by default for an already-installed printer. It all happens (in 10.5) in the file named com.apple.print.custompresets.plist in your user’s Library/Preferences folder. In 10.6, the file name is more complex:
com.apple.print.custompresets.forprinter.YOUR_PRINTER_MODEL.plist
To edit these files, you can use your favorite binary-capable text editor (TextWrangler, BBEdit, etc.), or the Property List Editor that comes with the free XCode development environment. Start by saving your favorite printer’s printing preset through the GUI the usual way, then edit the plist mentioned earlier.
What you are looking for is the com.apple.print.lastPresetPref key, which has a class of string, and a default value of Standard. Just replace Standard with the exact name of your saved preset, then save the edited file.
In 10.6, you also have to modify the com.apple.print.lastPresetPrefType (class is Number) key in the prefs file. You might need to play around a bit to find the number that matches your desired preset. In my case, with only one saved preset, it was 3.