Setting up Parental Controls on the iPhone and iPod touch
My kid wants an iPod touch for her birthday. I’m inclined to fulfill her wishes, but I’m a little concerned about her looking at objectionable content on Safari or YouTube, or running up big bills downloading apps and music. Does the iPod touch come with parental controls?
It does. You can’t limit certain sites in Safari, but you could block the app altogether. And YouTube, the App Store, and the iTunes Store can all be restricted too.
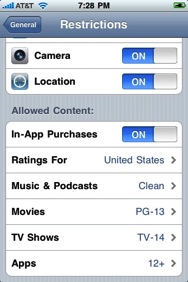
To get started, open the Settings app on the iPod touch, then tap General, and Restrictions. You’ll need to enter a four-digit passcode--don’t share it with your kid, obviously. Then you can disallow Safari, YouTube, the iTunes Store, the App Store, the camera (iPhone only), and Location (which disables the GPS chip in an iPhone or the Wi-Fi-based Location Services on an iPod touch). That’ll turn those apps off completely and forever--unless you go back to the Restrictions list and turn them back on.
If you don’t want to totally disable the iTunes Store or App Store while still limiting what they can access, the Restrictions list also has an Allowed Content section. Here you can limit downloaded movies and TV shows by their age rating, exclude music and podcasts rated “explicit”, limit app downloads based on age ratings, and even ban in-app purchasing.
If you want to protect your kid’s hearing, you can also check out Settings > iPod > Volume Limit to set the maximum volume to a lower level than the default. This can also be locked with a passcode so your kid won’t go right in and undo what you’ve done.
Clean .DS_Store, .Trash, and ._resources files prior to copy
Frequently we need to clean a directory before zipping it or copying it to an external USB drive to be used by Windows or Linux users.
Apple Finder has the custom of populating directories with those unavoidable .DS_Store files, volumes with .Trashes, and some files (especially pictures) with ._resources. The following interactive script will safely remove these files prior to copying.
#!/bin/sh
# bash script to clean (delete) Finder .DS_Store, .Trashes and ._resources
# Use cleandsstores.sh
# juanfc 2010-03-06

if [ $# != 1 ]
then
  echo "ERROR:  use\n\t`basename $0` dirtoclean"
  exit 1
fi

res=`find "$@" \( -name ".DS_Store" -or -name ".Trashes" -or -name "._*" \) -print`


if [[ -z $res ]]; then
  echo "nothing to delete"
  exit 0
else
  echo "Going to delete:"
  echo $res
fi
read -p "Ok (yYsS1)?" ok

case $ok in
  [yYsS1] )
    find "$@" \( -name ".DS_Store" -or -name ".Trashes" -or -name "._*" \) -exec rm -rf "{}" \; -prune ;;
  * )
    echo "aborted."
esac

exit 0
Disable AirPort when Ethernet cable is connected
At my office, We needed to find a way to turn of the wireless network when someone plugged in their network cable. We also did not want them to be able to turn the wireless network back on until the network cable was unplugged. We came up with the fallowing solution.
I created a launchDaemon called com.companyname.ethernetmonitor, and saved it in /System » Library » LaunchDaemons:
<?xml version="1.0" encoding="UTF-8"?>
<!DOCTYPE plist PUBLIC "-//Apple//DTD PLIST 1.0//EN" "http://www.apple.com/DTDs/PropertyList-1.0.dtd">
<plist version="1.0">
<dict>
  <key>Label</key>
  <string>com.companyname.ethernetmonitor</string>
  <key>ProgramArguments</key>
  <array>
    <string>/Library/Scripts/CompanyName/turnOffAirport.sh</string>
  </array>
  <key>WatchPaths</key>
  <array>
    <string>/Library/Preferences/SystemConfiguration</string>
  </array>
</dict>
</plist>
This will watch the System Configurations folder for changes. This folder changes when you plug in a network cable, turn on AirPort, etc. When it changes, a script called turnOffAirport.sh, stored in /Library/Scripts, is run to see if the Ethernet connection has a company IP address:
#!/bin/sh
if ifconfig en0 | grep 155.144;
then /usr/sbin/networksetup -setairportpower off
else
exit 0
fi
This helps keep the user from grabbing two IPs (our wireless and wired network use the same set of IPs), and also helps prevent a few other odd issues when a user is connected to both wireless and Ethernet networks.
Copy URLs from downloaded files
If you download a file with Safari or certain other programs, you may be able to copy its download URL from its Get Info window.
Select the file in the Downloads folder (or elsewhere) and press command-I. Find the Where From ntry in the More Info section of the Get Info window. Hold down the mouse button and drag across the URL listed there to select it, then choose Copy from the Edit menu (or press Command-C).
This will only work in 10.6; 10.5 won’t let you select the text in that field.
Create a shared mounted volume for all users of a Mac
The motivation for this hint was to have one folder for common use, with read and write privileges for every user. In Mac OS X, the Shared directory can be used by all users. However, a file there is still owned by the user who put it there. Another user cannot edit the file without authentication. This hint creates a common volume named AppleBasket, where users can have files in common.
In practice, an encrypted disk image mounting automatically for every user is a good solution to this problem. The following AppleScript automates the unixy requirements in creating such a disk image. Here’s the script:
(*
AppleBasket 0.9

Creates a common volume for all users.

Motivation for the script was to have a folder for common use, with read and write privileges for every user.
Tested with Mac OS X 10.4., 10.5 and 10.6. Requires launchd (appeared in Mac OS X 10.4).
Tuomas Rosberg 2010. Paste into a new document in AppleScript Editor, run from there or save as an application.
*)

-- To compile a unique name for the common volume:
tell application "System Events"
  set aList to every item in folder "/" whose name contains "AppleBasket"
  set aList to aList & (every item in folder "/Users/" whose name contains "AppleBasket") -- In case of this script being started and cancelled before.
end tell
set n to count aList
if n is 0 then
  set n to ""
end if
set imageName to "AppleBasket" & n as text
-- Info for the user:
display dialog ¬
  "The script will create “AppleBasket”, a common volume, readable and writable for every user, in directory /Users." & return & return & ¬
  "Next you will be asked for a password. Every user of the volume needs to enter it. (Only once if they save it in their Keychain.)" buttons {"Cancel", "OK"} default button "OK" with icon note
if button returned of result is "OK" then
  display dialog ¬
    "Please give a password used for accessing “AppleBasket”. " default answer "Common Volume" buttons "OK" default button "OK"
  set pWord to text returned of the result
  display dialog ¬
    "The password for “AppleBasket” is “" & pWord & "”" & return & return & ¬
    "Write it down to help your memory!" buttons "OK" default button "OK" with icon note
  display dialog "To create common volume for every user you will be asked to authenticate as an administrator." & return & return & ¬
    "Create disk image " & imageName & "?" buttons {"Cancel", "OK"} default button "OK" with icon caution
  -- Action: Create an image of 1 GB volume owned by root:
  do shell script "sudo printf \"" & pWord & "\\0\" | hdiutil create -volname \"" & imageName & "\" -size 1g -type SPARSE -fs HFS+J -encryption AES-128 -stdinpass \"" & imageName & "\"" with administrator privileges
  tell application "Finder"
    activate
    set fileName to imageName & ".sparseimage"
    if (exists of file fileName of startup disk) is true then -- this tests success of previous "do shell script", may be too abundant.
      my MountCommands(fileName)
    end if
  end tell
end if

on MountCommands(fileName)
  -- Move the disk image:
  do shell script "mv -nv ’" & fileName & "’ /Users/" with administrator privileges
  -- Give disk image read and write permission for all users:
  do shell script "chmod 777 ’/Users/" & fileName & "’" with administrator privileges
  -- Ready to write a preference list:
  set homeFolder to path to home folder as string
  set plistName to "org.AppleBasket.mount.plist"
  set newPlist to homeFolder & plistName -- A path string
  open for access newPlist with write permission -- Creates a new file, if it doesn’t exist.
  set f to result
  write "

  Label
  org.AppleBasket.mount
  OnDemand

  ProgramArguments

    /usr/bin/hdiutil
    attach
    /Users/" & fileName & "

  RunAtLoad

  WatchPaths

  /Volumes/"
to f
  close access f
  -- The administrator stuff to make the job work:
  set newPlist to POSIX path of newPlist
  -- Unload launchd jobs of /Library:
  try
    do shell script "launchctl unload /Library/LaunchAgents/" with administrator privileges
  end try
  -- Move the plist to a folder watched by the system starter, launchd:
  do shell script "mv -f " & newPlist & " /Library/LaunchAgents/" with administrator privileges
  -- Change ownership of the plist to system and group to admin:
  do shell script "chown root:admin /Library/LaunchAgents/" & plistName with administrator privileges
  -- Change mode of file to read for all, execute for none:
  do shell script "chmod 644 /Library/LaunchAgents/" & plistName with administrator privileges
  -- Load launchd jobs of /Library:
  do shell script "launchctl load /Library/LaunchAgents/" with administrator privileges
  activate me
  display dialog "A per-user job for every user has been installed to mount of the common volume automatically. Please log out and in." buttons "Quit" default button 1
end MountCommands
Paste into a new document in AppleScript Editor, run from there or save as an application. AppleScript was chosen so that I could make a (spartan) user interface. Any other scripting language would be much easier to debug, but AppleScript was all I tinkered with on Mac OS 9, before having kids and real life. To make a bigger disk image, edit the -size variable to something larger, like 10g.
Note that if Fast User Switching is in use and the AppleBasket volume is mounted for a user other than current one, there will be problems.
The script may be useful for a family Mac. Alternatively, one can set up an external hard drive or some storage cloud for every user of their Mac, of course.
Use your iPhone as a flash drive

You can use your iPhone as an external USB flash drive using this (currently) free software from myPodApps. Called iPhone Explorer, it’s a simple and lightweight program that lets you browse through your iPhone through it’s interface which works pretty well as a file manager. You can rename, create, delete, drag and drop, both files and folders on the iPhone using this app.
At the time of this writing, iPhone Explorer was a free download for Mac OS X and Windows, but based on our past experience covering software by the authoring company, myPod Apps, this could change at any time. So if you want to use your iPhone as a flash drive and want to do it for free.
Get Hulu content on your iPhone / iPod Touch by using screen recording
![]()
While everyone continues to wait for an official Hulu app for the iPhone/iPod Touch/iPad/whatever, you can beat them to the punch and get Hulu content on your iPhone now for free, using Snow Leopard!
This is a pretty crafty approach and it requires several things:
* Mac OS X 10.6 Snow Leopard installed
* Latest version of QuickTime Player (with Screen Recording support)
* Hulu Desktop client for Mac (for easy full-screen mode)
* The audio recording utility called SoundFlower (so you can record system audio while a screencast is going on)
In case you hadn’t guessed it yet, after you’ve met the above installation requirements, you basically just set your audio output device to SoundFlower, launch the Hulu app and get your show queued up, then from within QuickTime Player you start a new screen recording and start playing the Hulu show… afterwards simply go through the saved screencast and trim out the desktop stuff you don’t want, and then save the file as iPhone format… crafty huh?
You can see the full walkthrough at SampleTheWeb: How to use Snow Leopard to Record Hulu Content on your iPhone [ screenshot borrowed from SampleTheWeb ]

A simple fix for disabled fonts after OS upgrade
After upgrading to Mac OS X 10.6.2 (Snow Leopard) from Mac OS X 10.5.8 (Leopard), Your will found that the Tahoma font was not displayed by any Office 2004 or Office 2008 application.
Surprisingly, the Tahoma font (and many others) were found in the user’s Library/Fonts Disabled folder, instead of in the user’s active fonts folder (Library/Fonts).
Thankfully, simply moving all the fonts from the Fonts Disabled folder to the Fonts folder fixed the issue. After that, You can use Font Book to resolve duplicates, and FontDoctor and Font Finagler to fix any remaining font issues.
Change the carrier name in the iPhone Simulator
For you iPhone/iPad/iPod touch developers out there, did you know you can change the name of the carrier that appears in the iPhone Simulator? The default carrier name is Carrier, but you can change this to a custom name of your choice.
In Terminal.app, run this command, replacing your_user with your user’s short username:
defaults write "/Users/your_user/Library/Application Support/iPhone Simulator/User/Library/Preferences/com.apple.springboard" SBFakeCarrier "AT&T"
Find out how much you’ve spent at the iPhone App Store

Appropriately named App Store Expense Monitor does exactly what it’s name implies, it tallies up your App Store spending on iPhone/iPod Touch apps and gives you a grand total. The app works by reading your iPhone App information from the iTunes folder on your Mac and then it just tallies up the prices, but it does allow you to edit price information in case you got an app for free or at a reduced cost.
All of those little $0.99 purchases can sure add up!
Identify all known faces in an iPhoto photo
The following AppleScript will display a dialog box showing the names of every identified face in a selected photo in iPhoto:
tell application "iPhoto"
  activate

  set the selected_items to (get the selection)
  repeat with z from 1 to the count of the selected_items
    set this_photo to item z of the selected_items
    select this_photo
    set the query_results to my extract_face_record(this_photo)
    if the the query_results is not false then
      set AppleScript's text item delimiters to return

      repeat with i from 1 to the count of the query_results
        set the info_list to item i of the query_results
        if i is 1 then
          set the dialog_text to the info_list as text
        else
          set the dialog_text to the dialog_text & return & return & the info_list as text
        end if
      end repeat
      set AppleScript's text item delimiters to ""
      display dialog dialog_text
    end if
  end repeat
  select selected_items
end tell

on extract_face_record(this_photo)
  -- locate the current iPhoto library
  set iPhoto_library_path to do shell script "defaults read com.apple.iPhoto RootDirectory"
  -- expand the '~' if it's in there
  set iPhoto_library_path to do shell script "echo " & iPhoto_library_path
  -- add trailing slash if necessary
  if iPhoto_library_path does not end with "/" then
    set iPhoto_library_path to iPhoto_library_path & "/"
  end if

  -- locate the databases
  set the database_path to iPhoto_library_path & "face.db"
  set the iPhoto_database_path to iPhoto_library_path & "iPhotoMain.db"

  -- get the file path of the photo file
  tell application "iPhoto"
    if the class of this_photo is not photo then return false
    set the file_POSIX_path to the image path of this_photo
  end tell

  if the file_POSIX_path starts with iPhoto_library_path then
    set l to length of iPhoto_library_path
    set the file_POSIX_path to (text (l + 1) through -1 of the file_POSIX_path)
  end if

  -- get the file info record for the image file
  set the file_info_key to my SQL_command(iPhoto_database_path, "select primaryKey from SQFileInfo where relativePath=\"" & file_POSIX_path & "\";")
  if (count of paragraphs of the file_info_key) is greater than 1 then set the file_info_key to first paragraph of the file_info_key

  --get photo Key/ image key for the file info record
  set imageKey to my SQL_command(iPhoto_database_path, "select photoKey from SQFileImage where sqFileInfo=\"" & the file_info_key & "\";")

  --get detected faces for the image key
  set the face_keys to every paragraph of (my SQL_command(database_path, "select face_key from detected_face where image_key=\"" & imageKey & "\";"))

  -- create a list for each face {short name, full name, email address}
  set the face_records to {}
  repeat with this_key in the face_keys
    set this_face_info to {}
    -- get name
    set the short_name to my SQL_command(database_path, "select name from face_name where face_key=\"" & this_key & "\";")
    set the end of this_face_info to the short_name
    -- get full name
    set the full_name to my SQL_command(database_path, "select full_name from face_name where face_key=\"" & this_key & "\";")
    set the end of this_face_info to the full_name
    -- get email address
    set this_email to my SQL_command(database_path, "select email from face_name where face_key=\"" & this_key & "\";")
    set the end of this_face_info to this_email

    set the end of face_records to this_face_info
  end repeat

  return face_records
end extract_face_record

on SQL_command(database_path, command_string)
  return (do shell script "sqlite3 " & (quoted form of database_path) & " '" & command_string & "'")
end SQL_command
To use this, save it as a script in your user's Library » Scripts » Applications » iPhoto folder; create any of those folders as necessary whe