Automatically clean up Amazon MP3 downloads
By default, the Amazon MP3 Downloader application will automatically add downloaded files to iTunes for you. Also by default, it doesn’t clean up the downloaded files once they’re copied into your iTunes library. You can correct this by changing the Downloader to use iTunes’ built-in 'Add to iTunes' functionality.
In the Preferences of Amazon’s MP3 Downloader app, do this:
- Change the 'Save Downloads To' directory to the 'Automatically Add to iTunes' sub-folder of your iTunes Media folder.
- Uncheck 'Add downloaded tracks to iTunes.'
The next time you download an Amazon MP3 purchase, a dialog will appear when complete telling you where to find your files. If you have it reveal the folder, no files will be there because they’ve already been added to iTunes. Therefore, check the 'Never show again' box of this dialog.
iTunes will now automatically add any files put in this folder and delete them when done, so you no longer have to worry about duplicates lying around.
Extract a complete ISO from an encrypted DVD
I search for a program comparable to the Windows’ application DVD Decrypter is finally complete. If you’ve ever wanted to create an ISO of a DVD -- in order to keep all of the menus, special features, language options, etc. of an encrypted DVD intact -- I’ve got a straightforward solution:
- Download and run the (free and open source) Fairmount from Metakine Inc.
- Insert the DVD into your computer; in a few moments Fairmount will ’ghost’ a decrypted image of your DVD.
- Run Disk Utility and select this new image from the left hand panel (it will look something like
disk3). - Select Images » Convert... in Disk Utility’s menu.
- Name your file, select a location, and use ’DVD/CD Master’ for the image format; click Save.
Once Disk Utility is finished, you’ll have an exact copy of your DVD which can be mounted for future use by a program like DVD Player or Handbrake. If you would like to share the image with another operating system, simply change the extension from .cdr to .iso.
How to repair sync abilities if they broke with iTunes 9.1
Apparently a lot of folks are running into iPhone syncing problems after installing the iTunes 9.1 upgrade through software upgrade. If you are also having the same problems, check your user’s Login Items and make sure iTunesHelper is there. If it’s not, you will run into syncing problems with you iPhone or iPod. Here’s how to fix this.
Open System Preferences and select the Accounts icon. Click on your account name in the left column, and click the Login Items tab on the right. If you are having sync problems, there is a good chance you won’t see an entry there for iTunesHelper.
If that’s the case, open the Applications folder in Finder. Find iTunes, Control-click on it, and select Show Package Contents from the pop-up menu. In the window that apears, open the Contents folder, then the Resources folder. In your window, you should see an application names iTunesHelper. Drag this program to your Login Items window to add it to your login items.
Next, double click the iTunesHelper application in Finder to start it. Close all finder windows and system preferences. Connect your iPhone/iPod for renewed syncing bliss.
Create Your Own Custom Terminal Commands
The title of this post is a little misleading, what we are going to do today is develop our own Bash command to work in Terminal to allow use to do simple, repetitive commands, with only a couple of keys. Think of they as macros, a simple and easy way to cut down time. This doesn’t take long and it can be powerful, and like anything in life it just takes a little bit of know how. This tutorial is great if you have a specific folder which you visit again, or a Terminal command you run frequently.
First things first open Terminal in Applications > Utilities. Then type ls -a you should see a lot of files. Depending on the version you use you should see a file called either “.bash_profile” or “.profile”, remember which is one is present. If none are present it doesn’t matter. Then type nano .bash_profile into Terminal to open up a text editor. If “.profile” is there try nano .profile. It is probably worth saying now, if this doesn’t work with one file name, try the other.
This file controls some of the aspects on how Bash works. Bash is the program that runs within Terminal, there are other ones but we wont get into that. What we are going to write is a macro/function/what-ever-you-want-to-call-it which will run hen the command is typed. Your bash profile may have some text in it already so scroll down to the bottom with the arrow keys if it has. Then write the following:
test(){
This is the beginning of our code. It will run when we write test into Terminal. Then write the following on a new line (change it as you wish).
cd /Users/[name]/Desktop

}
Change [name] to your name, or change the whole path to something you know exists. Make sure the closing curly brackets is on a new line. To finish press Control + O. Your changes will now be committed. To test them open a new Terminal window by pressing Command + N, and type test into the Terminal prompt. If everything goes to plan, the new directory will be picked. By opening a new window you can test any changes while still having the original text editor open. Any errors will be at the top of the Terminal prompt when you open a new window.
Now you have the workings we can make things more interesting. Anything on the “cd /Users…” line change be changed to anything you want. You can have more than one command by ending them in a semi-colon and putting the second command on a new line. Always make sure that the curly bracket is on a new line and the name you give is unique.
If you want to make things a little bit more complicated you can. In the next example I am going to use a variable. Variables are represented by “$1″. For example the following:
test2(){

cd /Users/"$1"

}
Will work when you type into Terminal:
test2 James
The first word after “test2″ will take the place of the $1 symbol. You can add more than one variable as such.
test2(){

cd /Users/"$1"/"$2"

}
So:
test2 James Desktop
Will result in Terminal in terminal changing the directory to my Desktop. The variables can appear any number of times, just put them in speak marks.
Have a play around with the commands, over time they will be come more complex. If you want to remove anyone simply delete the entry. To close the text editor press Control + X. Note changes you make will only take effect when a new Terminal prompt it open.
If you want to learn more there is hundreds of books around. Simply google “Bash Programming”, or check out some books in Amazon, some good ones include Pro Bash Programming, Learning the bash Shell, Bash Cookbook or any bash programming on Amazon.
Change The Default Address Book Template
When you are using Address Book to add contacts you may find that there is limited input options for various bits of information you have about a contact. This may, in some circumstances, be a problem and on the face of it it can be quite difficult to add to a contact. However help is at hand. This post is going to discuss changing the basic template which Address Book operates from so you can add all the fields you want. Its rather simple (and fun) and you can soon change the template to have all the information you want.

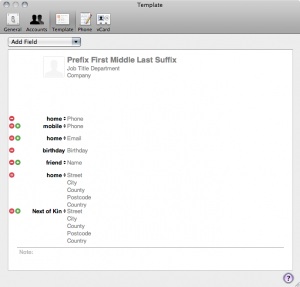
To change the template, open Address Book and go to the Preferences, either by press Command + , (comma) or going to Address Book > Preferences. Within the preference pane select the Template option. Here you have a basic template which you can modify. Modifications are made in two ways. Using the drop down or the small green plus arrows by a section.
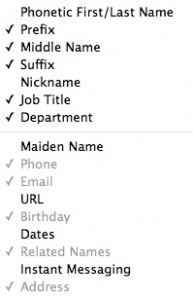
To add a section select the drop down menu. This is split into two sections. The top half of the drop down menu belongs to the area around the image. This includes name and job. You can’t change how these are displayed. The bottom half is for information where there may be multiple copies. From the drop down select the piece of information you want (eg URL) and it will be displayed in the template.
Within the template you can then choose how many times an option is displayed and the type. For example with Phone, if you click the green plus arrow a second phone option will appear which you can change to “work”, you can do this as many times as you want with each option. Each one can be changed individually to suit your needs, if you don’t use an option when adding a contact it wont be displayed, so add as many as you potentially need.

If you notice the options drop down menu has parts greyed out. To remove an option simply press the red minus arrows within the template until all of the options have been removed. You will then find the option is selectable again within the drop down menu.
After playing around I have come up with something that looks like this. You can do a lot of customisation to the point where you could have every bit of information imaginable added to the template.
Disable the “Are you sure you want to open this file?” warning dialogue in Mac OS X
Starting in Mac OS X Leopard, you may have noticed that when you download a file from the web and go to open it, you will get a prompt saying something along these lines.
This is Mac OS X just being safe, but if you always know for sure what you’re downloading it could even be overly safe. You can disable this quarantine message by launching the Mac Terminal and typing the following command:
defaults write com.apple.LaunchServices LSQuarantine -bool NO
You will then need to reboot (although killing the Finder should work as well) for the changes to take effect. To reverse this and get the file quarantine message back, type:
defaults write com.apple.LaunchServices LSQuarantine -bool YES
Again you will need to reboot (or kill the Finder) to have the changes back.
Setting the default column size in Mac OS X Finder windows
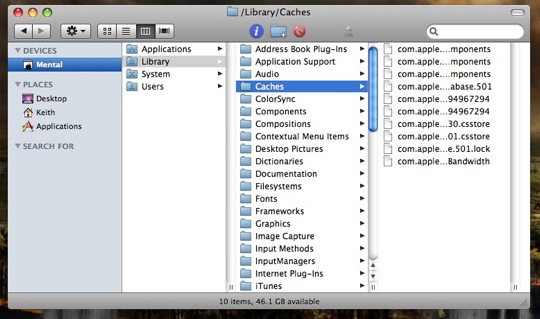
The Mac OS X Finder’s column view is really handy, but unless you set the default column width, anytime you launch a new Finder window the columns size will be reset. Changing this behavior is very simple, hold down the Option key while dragging the columns to your desired width/size, and this will become the new default.
