AirPrint Compatible Printers

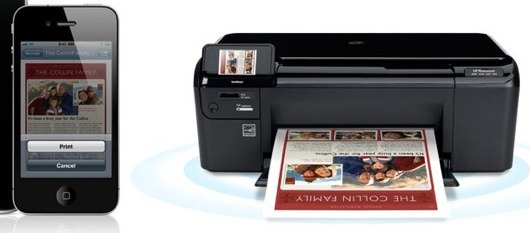
AirPrint is the new wireless printing technology that is incorporated into iOS 4.2, and it allows you to print to AirPrint compatible printers directly from your iPad, iPhone, or iPod touch. Apple is working with printer manufacturers to make more printers compatible with the technology, and software updates will likely be issued to support these printers as they become compatible.
AirPrint Compatible Printers
Here is the current list of printers that are AirPrint compatible right now, according to Apple:
- HP Envy e-All-in-One series (D410a)
- HP Photosmart Plus e-AiO (B210a)
- HP Photosmart Premium e-AiO (C310a)
- HP Photosmart Premium Fax e-AiO (C410a)
- HP Photosmart e-AiO (D110)
- HP Photosmart eStation (C510)
- HP LaserJet Pro M1536dnf Multifunction Printer
- HP LaserJet Pro CM1415fn Color Multifunction Printer
- HP LaserJet Pro CM1415fnw Color Multifunction Printer
- HP LaserJet Pro CP1525n Color Printer
- HP LaserJet Pro CP1525nw Color Printer
This supported printer list is directly from Apple. You’ll notice that some of the printers are basically the same model number but may have a ‘w’ thrown onto the model to emphasize the built-in 802.11 wireless capabilities, the Laserjet printers without those just need to be hooked up to a computer but they will still support AirPlay. If I was to be in the market to buy a new printer I would probably go for a wireless model for convenience, but all these printers work immediately with AirPrint and don’t require any additional setup or hacks, you should be able to find them on your iPad, iPod touch, or iPhone and print to them completely wirelessly.
Can I use AirPrint with other printers? Can I make another printer compatible?
Yes, but it involves using a hack and the printer must be hooked up to a Mac or Windows PC to work. You can make any printer AirPrint compatible for both Mac OS X and Windows, using something called AirPrintHacktivator, but it may be unreliable and prone to bugs. The other downside is that since the printer must be hooked up to a computer, the hack doesn’t offer quite the same wireless flexibility as it requires the computer to be turned on for the printer to work.
If you already own a printer, go ahead and try the hack app, but if you’re shopping for a new printer anyway I would recommend just buying one that comes with AirPrint compatibility by default.
Fix for “No Content” on iPhone & iPod after iOS 4.2.1 update

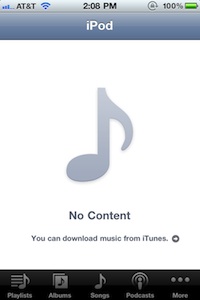
Some users are reporting that their song and media library has disappeared after downloading iOS 4.2.1 and installing the update. You’ll know you’re effected because instead of your typical iPod music library loading in the iPod app, you’ll get a message that says “No Content” and telling you to download music from iTunes.
Thankfully there’s an easy fix for the “No Content” bug, here’s what you do to make your music and media content reappear:
- Disconnect your iPhone or iPod from your computer and then reconnect it again
- Select your device in iTunes
- Select Music and start playing a song from iTunes
- Sync your iPhone as usual
- Launch the iPod app, your music should appear
If your music and media library have not reappeared then try the process again, it should work.
This is an interesting bug and it certainly isn’t effecting everyone who updates to iOS 4.2.1, there doesn’t seem to be any particular iPhone or iPod touch that is effected either. Hat tip to TechCrunch for finding the simple solution.
Free native read of HFS+ disks in Windows
Here is a solid, free solution to reading HFS+ formatted discs in Windows OS using only the Snow Leopard install disc. The nice thing is that the Windows install doesn’t have to be 'real' Boot Camp.
Inside Windows:
- Load up the Snow Leopard disk.
- Ignore Autoplay.
- Navigate to Boot Camp » Drivers » Apple » Bootcamp.msi.
(Note: please choose Bootcamp64.msi if you’re running 64 bit Windows). - Follow the installer instructions.
- Restart.
- Using Start » Run » msconfig, disable ’Boot Camp’ from running at start up.
- Restart again.
You should now see your HFS+ partitions of external or internal drives. Tested on a Windows 7 laptop (non Boot Camp).
Force HTML5 video use in Safari 5 on the Mac
If you prefer HTML5 video to Flash, here is a method suggested by John Gruber to employ User Agent masquerading in Safari 5 to try to force sites to serve it to you.
If you turn on the Develop menu in Safari (Preferences » Advanced » check the box), you get the option to choose the User Agent string Safari will hand to a site to tell what browser it is.
From the Develop menu, Choose User Agent » Mobile Safari 3.2.2 - iPad and the site will switch to HTML5 if it supports it. You will need to refresh the page if you’ve already loaded it.
The setting will only last for the current browsing session. It can be made persistent using the following command (note that this is slightly different than the command linked to in the article; that one produced errors when I tried it in Terminal):
defaults write com.apple.Safari CustomUserAgent "'Mozilla/5.0 (iPad; U; CPU OS 3_2 like Mac OS X; en-us) AppleWebKit/531.21.10 (KHTML, like Gecko) Version/4.0.4 Mobile/7B334b Safari/531.21.10'"
This can be undone by:
defaults delete com.apple.safari CustomUserAgent
How to use the Screen Recorder on a Mac

If you need to record screen activity on a Mac, you don’t need to download any additional software because the functionality is built directly into Mac OS X.
Using the Screen Recorder in Mac OS X
The screen recorder function is included with QuickTime Player in Mac OS X 10.6 and later, meaning it’s free and doesn’t require any downloads. Here’s how to use it:
- Launch QuickTime Player (located in /Applications/)
- Pull down the File menu and select “New Screen Recording”

- Press the Red button to start recording the screen activity
- To stop recording, either press the Stop Recording button in the menubar, or hit Command+Control+Escape
- Once the recording is stopped, the capture is automatically opened in QuickTime Player as “Screen Recording.mov” which you can then save and use as you’d like
QuickTime Player gets out of the way when you are recording the screen so that the activity is not obstructed by the application, this is also why it’s best to just use the keyboard shortcut to halt the screen recorder.
A quick note for users of 10.5 or below: instead of paying for recording software, it’s often cheaper to just buy the Snow Leopard upgrade.
Enable AirPrint in Mac OS X 10.6.5

For whatever reason, the Mac OS X 10.6.5 update did not include AirPrint shared printing support (meaning you can’t print from an iOS device to a shared Mac printer). But, you can unofficially enable AirPrint by downloading a few AirPrint files from 10.6.5 beta releases and then putting them in the appropriate location on your Mac.
This is a pretty straightforward process, but remember you are using software that was pulled from the release of 10.6.5, proceed at your own risk:
Step 1) Make a backup of the following files:
- /usr/share/cups/mime/apple.convs
- /usr/share/cups/mime/apple.types
Some users won’t have urftopdf. It’s absolutely crucial that you backup these files, if the beta files cause you problems you need to be able to restore them.
Step 2) Download the AirPrint files, remember these are beta, so use at your own risk.
Step 3) Copy the downloaded beta AirPrint files to these three locations:
- /usr/libexec/cups/filter/urftopdf
- /usr/share/cups/mime/apple.convs
- /usr/share/cups/mime/apple.types
Step 4) Restart your Mac
Step 5) Delete and re-add the printer you want to share with iOS devices
Remember, AirPrint is only included in iOS 4.2 so without the update (GM or otherwise), you won’t be able to use AirPrinting.
There’s obviously some reason that Apple opted to remove AirPrint support from Mac OS X 10.6.5, so perhaps it’s still a bit buggy. If you don’t mind taking some chances, this trick from LifeHacker does work.
Flip around (invert) the Magic Trackpad
The Magic Trackpad normally slants up to match the keyboard angle. Some may prefer to use it slanted down in their lap, on the couch, or on low desks with a gel palm rest. With this hidden pref, the trackpad auto-detects hand orientation from 5 resting fingers and rotates the coordinate system to match.
When slanted down, the mechanical button is at the front, activated by the fingertips instead of the thumb. If you don’t like this, try turning on tap-to-click and 3-finger drag in the trackpad control panel. (You may then want the defaults write that moves navigation swipes from three to four fingers, displacing Exposé and application switch).
Type this in terminal:
defaults write com.apple.trackpad.orientation TrackpadOrientationMode 1
The orientation detection should become active after rebooting, reconnecting the trackpad, or changing other settings in the trackpad control panel. Just rest 5 fingers on the Magic Trackpad after turning it around and the cursor will thereafter move in the desired direction.
Get Windows 7 style window previews on your Mac Dock

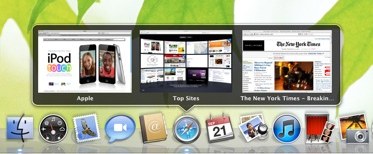
One of the features of Windows 7 that gets pretty good reviews is the window preview, you access these by hovering over items in the Windows task/start bar and a little preview of the minimized window is shown as a pop-up. With a little utility called HyperDock, you can get this same functionality on your Mac Dock.
HyperDock includes window previews (see screenshot above if you’re not sure what this would look like), some advanced window management features, and you can even control iTunes and iCal through the preview windows.
If you want this sort of thing on your Mac, check out HyperDock, it’s free for now while it’s in beta but is expected to cost money when the final version is released.
Set the language of apps in a jailbroken iOS device
This hint works for apps that have different languages available and choose one depending on the OS’s default language settings. For example you want to have iOS localized to German but have Plants vs. Zombies in English.
Go into the filesystem (via SSH or PhoneDisk) to the application’s folder (e.g. /Users/Applications/ALOTOFNUMBERSANDCHARACTERS/NameOfTheApplication).
If there are folders like en.lproj or de.lproj (these are the localization resources) you can easily swap their names. So, if you want the English app on a German device, rename the en.lproj into en.lproj.bak and the de.lproj into en.lproj.
Next time you start the app it should be English, or whichever language you selected.
Launchd wildcard characters
One of the occasional irritations of working with launchd is that it doesn’t naturally expand shell wildcard characters (~,*,?,...). This means that full paths have to be spelled out for all files: an annoyance at best, and an obstacle when commands need to select specific groups of files or do work across different home folders. For example, a command to clean certain files from a user folder when any user logs in, which is simple enough to write in the shell -- rm -f ~/Folder/*.xxx -- fails when written into a launchd plist.
However, launchd can expand shell characters, but expansion is disabled by default (assumedly for performance reasons). To enable expansion, add an EnableGlobbing key to the plist and set its value to true. The plist for the above shell command, then, would be:
<?xml version="1.0" encoding="UTF-8"?>
<!DOCTYPE plist PUBLIC "-//Apple//DTD PLIST 1.0//EN" "http://www.apple.com/DTDs/PropertyList-1.0.dtd">
<plist version="1.0">
<dict>
 <key>RunAtLoad</key>
 <true/>
 <key>EnableGlobbing</key>
 <true/>
 <key>Label</key>
 <string>user.files.rm.globbed</string>
 <key>ProgramArguments</key>
 <array>
  <string>rm</string>
  <string>-f</string>
  <string>~/Folder/*.xxx</string>
 </array>
</dict>
</plist>
Which should work as expected.
Unfortunately, expansion is only enabled for strings in the Program or ProgramArguments keys, not for other keys (such as the WatchPaths, QueueDirectory, or WorkingDirectory keys), so this can’t be used to set up wildcard triggers.