Show a “Now Playing” iTunes Notification in the OS X Dock

Using a defaults write command, the iTunes Dock icon can be set to display a “Now Playing” song and artist pop-up that transitions in and out and music starts. It’s a nice addition, particularly if you’re playing songs from a shared network playlist and have iTunes hidden in the background.
Enable the iTunes song & artist Dock icon popups
Open the Terminal in /Applications/Utilities/ and type the following:
defaults write com.apple.dock itunes-notifications -bool TRUE
Now kill the Dock to relaunch it:
killall Dock
Start playing a song in iTunes to see the notification appear, it’ll disappear automatically and then reappear briefly anytime a new song starts.
If you decide you don’t like the notification, disabling the iTunes song popup is just as easy:
defaults delete com.apple.dock itunes-notifications
You won’t need to relaunch iTunes, but you will need to kill the Dock again.
This only works in Mac OS X 10.7 Lion, if you try it in prior versions nothing happens. Nice find by TheNextWeb.
Disable Your Mac’s Apple Remote
If you have an Apple Remote and you want to disable its usage on your Mac, for example in a School environment or you just don’t want the receiver switched on its very simple to do. This post will show you how to disable your remote control infrared receiver so it can’t be used any more.
To start open up System Preferences in Applications. Press the Security option in the Personal section of the preferences. Press the lock at the bottom of the screen to allow you to change the general settings. You will notice at the bottom of the screen an option to disable the remote control infrared receiver, checking the box will disable the device.

Its a simple as that. The best thing is the option is password protected so if you have fiddly kids or students they shouldn’t re-enable the option.
Get Exact Boot, Sleep, and Wake Times from the Command Line
Need to know exactly when your Mac was last booted, put to sleep, or woke from sleep? You can get precise information directly from the command line.
Get Precise System Boot Time
sysctl -a |grep kern.boottime
The results will look something like this:
kern.boottime = Mon Jul 4 08:00:42 2011
Get Mac System Sleep Time
sysctl -a |grep sleeptime
Resulting in something like:
kern.sleeptime: { sec = 1310538756, usec = 323918 } Tue Jul 12 23:32:36 2011
Get Mac OS X System Wake Time
sysctl -a |grep waketime
Results will resemble this:
kern.waketime: { sec = 1310573055, usec = 11 } Wed Jul 13 09:04:15 2011
Add a Recent Items Menu to the Dock
You can add a Recent Items menu to the Mac OS X Dock by using a defaults write command. The default is set to “Recent Applications” but once the Dock item exists you can adjust it to feature other recent items too.
Launch the terminal and enter the following:
defaults write com.apple.dock persistent-others -array-add '{ "tile-data" = { "list-type" = 1; }; "tile-type" = "recents-tile"; }'
That needs to all be on a single line, so if you copy and paste it make sure the command is one string.
You will then need to kill the Dock:
killall Dock
Now right-click on the newly appeared Recent Applications Dock item and you can change it to be Recent Applications, Recent Documents, Recent Servers, Favorite Volumes, or Favorite Items.

If you want to remove the Recent Items menu, just drag it out of your Dock.
Hide the Mac Finder Window Sidebar

You can hide the sidebar from Mac Finder windows by hitting Command+Option+S, this command keeps the window toolbar buttons intact across making it different than than clicking on the grey pill-button.
If you’re not a fan of keyboard shortcuts, you can also select this option manually through the View menu and choosing “Hide Sidebar.” This change will affect all Mac OS X windows.
Fix SSD slow boot times
If you’ve just upgraded from a disk drive to a solid-state disk, booting from reset should take about 15 seconds, logging in should take about 5 seconds, and applications should launch about three to five times faster. However, you may find that everything is faster except the boot from reset, with the initial Apple logo not appearing for about 30 seconds.
The fix is to go into System Preferences » Startup Disk and select your new solid-state drive. This prevents a 30-second timeout before the boot starts.
Upgrading to a SSD is easy, if a bit expensive. I’d suggest turning your brand-new SSD into a temporary external USB drive using a Universal HDD USB Adapter from Apricorn or NewerTech and format it as HFS Extended Journaled, 1 partition, with Disk Utility. You can then clone your hard drive to it with Carbon Copy Cloner, making sure you are logged in as a administrative user who does *not* have FileVault enabled. Then open up the Mac (using instructions from iFixit.com) and swap the two drives. Set the startup drive and you’re done.
How To Backup Your iPhone, iPod or iPad
Before you upgrade your device it’s always a good idea to back up all of your data. This is especially important when you haven’t synced your device in a while. While the chances of a error occurring and forcing you to go full restore are slim, it’s always a good idea to backup your stuff.
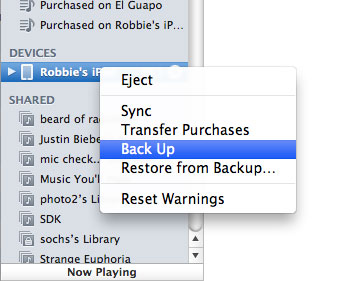
Plug your device into iTunes, right click on your device in the left panel. Select Back Up from the drop down menu. It might take a while, but it’s worth it if things going horribly wrong.
How to Re-Index Spotlight
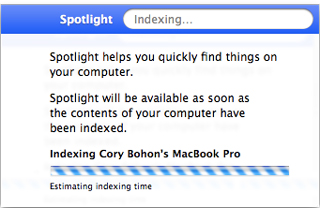
If Spotlight’s acting funky, re-indexing will get it up on the right side of the bed.
Spotlight search results not appearing as they should? Force Spotlight to re-index itself with the following two commands:
sudo mdutil -E /
sudo mdutil -i on /
You’ll be prompted for your administrator password. Then, after a few minutes’ delay, Spotlight will begin re-indexing your Mac.
How to Put Spacers in your Dock to Organize Apps

Here’s Cory’s impressively crowded Dock before he added spacers...

...and afterward, those lovely little gaps create logical groupings of kinds of apps.
The Dock is a great place for your most-used applications, but it can get a little crowded. With a Terminal command, you can add spacers to your Dock to organize things a little better. Open Terminal (Applications > Utilities), then type the following command:
defaults write com.apple.dock persistent-apps -array-add ’{"tile-type"="spacer-tile";}’
Type the command once for each space you’d like to add, then type the following to restart the Dock:
killall Dock
In the new Dock, you’ll see the spacers to the right of your applications. Drag spacers around to create “sections” of applications in your Dock. To remove a spacer, simply drag it off the Dock.
How to Create a Recent Items Stack in the Dock
Stacks let you quickly access data from your Dock, but Apple doesn’t let you add a stack containing your most recently accessed files or apps unless you use the following Terminal command:
defaults write com.apple.dock persistent-others -array-add ’{ "tile-data" = { "list-type" = 1; }; "tile-type" = "recents-tile"; }’
Then restart the Dock:
killall Dock
When the Dock reappears, you’ll find a stack of recent items beside the Trash. To change which items appear in the stack, right-click it to choose Recent Applications, Recent Documents, Recent Servers, Favorite Volumes, or Favorite Items.
Discover the Hidden Power of TextEdit
Although we recently took a look at some major players in the word-processing world and marveled at their fancy features, if you’re into having a minimalistic work environment and making the best of what you’ve already got, then it will interest you to know that TextEdit, OSX’s native text editing application, is a lot more powerful than you might have given it credit for.