How To Make your Mac a Web Server
5. Set up your Domain
Technically, this is an optional step, because you can already browse to your site at http://[your IP address here], but unless you have a photographic memory, chances are you aren’t going to remember a string of pseudo-random numbers. So you can buy a domain at a site like GoDaddy.com or Yahoo Domains (smallbusiness.yahoo.com/domains), but you can also register for a free domain at a site like DynDNS.com, with a little less control over what your domain actually is.

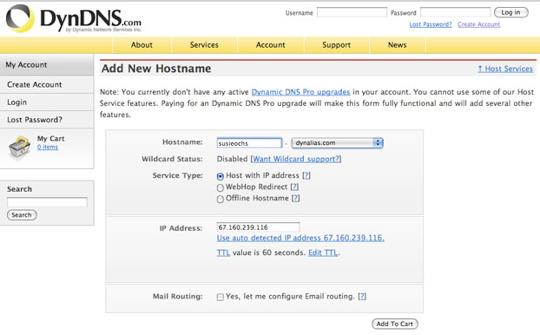
To do this, go to www.dyndns.com/services/dns/dyndns/ and click the Get Started button. In the Hostname area, type in a name you can remember, and then choose what comes after the dot in the drop-down. (We went with ourname .dynalias.com.) For Service Type, leave the default Host With IP Address selected. Your external IP goes in the IP Address box, and there’s also a button to auto-detect it—it should match the external IP you wrote down in step 4. Click the Add To Cart button and check out; this service is free, so it won’t ask you for credit card info, but you do need to create a user account at DynDNS.com when prompted.
6. The DynDNS Updater

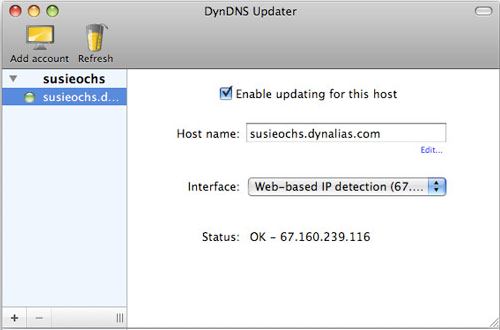
DynDNS Updater will keep your host name pointed to your ever-changing external IP address.
Head to www.dyndns.com/support/clients/mac.html and download the DynDNS Updater application. Load the DMG file, and drag the application into your Applications folder to install it. Launch DynDNS Updater, login with your DynDNS account credentials, and you’ll see your account name in the sidebar. Click the right-facing arrow to show your website, and select it. Check the box labeled "Enable updating for this host," and you should be good to go. Now, if your router’s ports are forwarded properly, you can browse to your site at the domain you just created.
7. Install a CMS
This is optional, but a CMS, or content-management system, is incredibly useful if you want to host your own blog. The most popular ones are WordPress and Drupal. To install WordPress on your system, first download the WordPress ZIP file. Unzip it and drag the WordPress folder to /Applications/MAMP/htdocs.

After changing the DB_USER and DB_PASSWORD names.
Now, browse to that WordPress folder, and open the file wp-config-sample.php in a text editor such as TextEdit. You’ll notice there is a space for DB_NAME, DB_USER and DB_PASSWORD that have things that you need to fill in. Replace ‘usernamehere’ with ‘root’ and ‘yourpasswordhere’ with ‘root’ as well. Now we need to create a database, so we can fill in ‘putyourdbnamehere.’ Leave the file open in your text editor for now.
8. Create a Database
Open the MAMP.app application, and click Open Start Page, which launches the MAMP start page in your default browser. In the toolbar along the top of that page, click "phpMyAdmin." Under "Create new database," enter a name for the database, and click Create.

Create your database name here.
Now, come back to the wp-config-sample.php file that’s open in your text editor, and replace ‘putyourdbnamehere’ with the name of the database you just created, enclosed in single quotes. Finally, save the modified file as wp-config.php.
9. That’s It
Now, you can browse to http://localhost/wordpress, and the WordPress Install Utility will guide you through the rest of the process. In general, you can save any file in the htdocs folder, and you will be able to access it from the Web—think of it as a file browser for the Web. Instead of browsing to htdocs on your computer, you’re browsing to your URL, and then entering the file’s path. Files that the browser can’t interpret, like music or videos, will be downloaded when you browse to them, and files that can be interpreted will be displayed. Beware of trying to download too much information from your home-rolled Web server or having too many people browse to it at once—your computer will heat up and might explode or something. If you plan on truly taking over the Internet, get someone else to host your website.