apple tale (50 Things Every Mac fans Should Know)
Like a champion cyclist knows bike parts,a car buff knows model years, and a sports fan knows win-loss records, all Mac geeks worth the title must know these things.

 Since Safari and Firefox both support FTP, you might just be tempted to upload and download files from your own FTP server using your browser of choice. To that we say, "Don’t do it!" FTP file transfers are much more reliable using a dedicated FTP app. There are a variety of freeware and shareware FTP apps for the Mac, but we’ve always been partial to Cyberduck. And now the smarties over at MacTips.org (www.mactips.org) have confirmed our choice by offering several reasons Cyberduck rocks:
> You can upload files to your FTP server via a handy Dashboard widget.
> Cyberduck has AppleScript support.
> In Preferences> Bandwidth, you can set the maximum bandwidth Cyberduck can use at any time. You can also limit bandwidth at the transfer level by pressing Command-T and limit the maximum number of connections to your FTP server in Preferences > Connection.
> Cyberduck lets you to edit a text file remotely as if it were stored on your local disk. Just Control-Click the file, select Edit With, then choose your text editor.
For more reasons to use Cyberduck, see Mactips.

We’re cheapskates—or should we say, careful with our money? We present two affordable ways to create ringtones for your iPhone with songs that are already in your iTunes library. The first uses GarageBand ‘09, which you might have on your Mac if you bought it very recently, as part of the iLife creativity suite. The second requires QuickTime Pro.
MAKE A RINGTONE IN GARAGEBAND ‘09
1. Be sure you have a song that is not protected by DRM (digital rights management) that you can use for your ringtone. The easiest way to do this is to import a song from a music CD into iTunes by inserting the disc into your Mac’s optical drive and clicking Import when iTunes asks if you’d like to import it. If you really want to use a DRM-protected song you bought from the iTunes store, you can burn it to a CD as an audio file in iTunes (create a playlist by pressing Command-N and dragging it to the new playlist, select the playlist and then click Burn Disc). You can do this in fewer steps using Rogue Amoeba’s Audio Hijack Pro ($32).
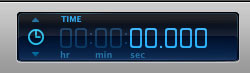
The icon to the left of the LCD in the bottom center is the metronome. Change its units of measure to Time by clicking it and selecting Time.
2. Launch GarageBand and press Command-N to create a new project. Select iPhone Ringtone in the sidebar of the new file dialog, click Choose, and name your ringtone. To get your desired song file into the project window, click the Media Browser icon in the bottom-right of the GarageBand window to view your iTunes library. Select the song you just imported from a CD and drag it to the project window. Or, if you’re using an iTunes song that you burned to a disc, put the disc into your CD drive, double-click the CD icon on your Desktop and drag the song from the Finder onto the center portion of the GarageBand workspace. Change the ruler display at the top to show seconds by clicking the metronome icon in the LCD at the bottom and choose Time from the pop-up options. This will make it easier to see where you want to start and stop your ringtone, which can be no longer than 40 seconds.

We only made the cycle region for Coldplay’s "Viva La Vida" 23 seconds because we just wanted that much of the song.
3. To create a cycle region that’s no longer than 40 seconds, drag the length of the yellow ruler at the top, so it’s shorter than 40 seconds. To make it easier to see that far to the right, click the eye icon in the lower-right to hide the loops and media viewers. Click the |< icon (back-to-the-beginning button) to go to the beginning of the song and listen to it, so you can tell if you like how the cycle region falls. If not, make adjustments as necessary. To start the ringtone in the middle of the song, position the mouse at the beginning of the loop (far left) until you see an icon that looks like a left arrow and a right arrow with an open bracket in the middle. Click and drag to "cut" the song, so it starts where you want it to (it helps to move the playhead to that point, so you can use the red line as a guide for where to stop dragging). Press Play to listen to it to make sure you like how it falls. If you cut off too much, press Command–Z and start over.
4. When you’re happy with your ringtone, save it and choose Share > Send Ringtone to iTunes. Once it’s done converting, iTunes will launch and start playing your new ringtone. Sync your iPhone with iTunes to get the ringtone onto your phone.
MAKE A RINGTONE IN QUICKTIME PRO
It costs $29.99 to upgrade to QuickTime Pro from the free QuickTime Player (www.apple.com/quicktime), but you can accomplish the same results for free using Audacity (audacity.sourceforge.net).
1. In QuickTime Pro, go to File > Open and pick an audio file. As with GarageBand, don’t use a DRM-protected audio file.
2. Slide the sliders (below the line that shows your track’s progress) around the section of the audio you want to use as your ringtone. This isn’t as precise as doing it in GarageBand—it can help to make the QuickTime Player window really, really wide, so you get a little finer control.
3. When you’ve got your 30 seconds or so of music selected, press Command-C or go to Edit > Copy to copy that section to the clipboard. Press Command-N or go to File > New Player to open a new QuickTime window and press Command-V to paste in your audio clip.
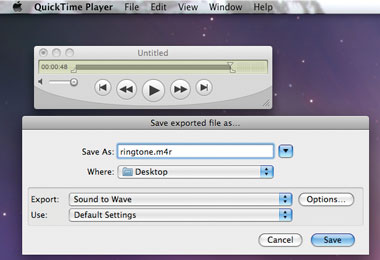
The key to converting your selection to the proper ringtone format is to save it as an .m4r file.
4. Press Command-E (or go to File > Export) to export the file to your Desktop as RINGTONE-NAME.m4r, replacing RINGTONE-NAME with whatever you want to call it.
5. Double-click your new ringtone in the Finder to import it to iTunes, and then sync it to your phone.
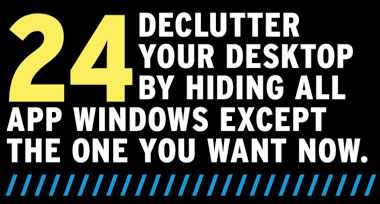
If your Command-H trigger fingers are getting sore from all that window hiding--or if you’re just stuck with too many apps and docs to work with and too small a monitor, you can set the Dock to hide all windows except the app window you want by executing this Terminal command: defaults write com.apple.dock single-app -bool TRUE. Press Return, then type killall Dock.
Now every time you click an app icon in the Dock, it will open the most recent window used in that app and hide all other windows until you call them forth. The other way to accomplish this is to press Command-Option while clicking an app icon in the Dock.

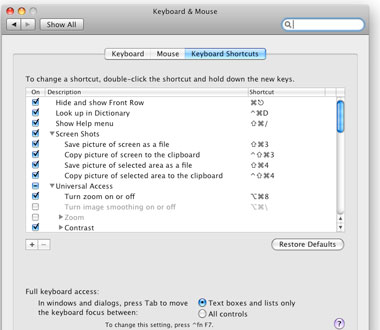
Can’t recall what key presses do what on your Mac? The Keyboard & Mouse > Keyboard Shortcuts System Preference reveals all.
We provided a short list of our favorite OS X shortcuts earlier, but you can totally personalize the key combos on your Mac if you want. Go to System Prefs > Keyboard & Mouse > Keyboard Shortcuts.
This System Preference is also useful for learning the existing shortcuts, as well as changing the ones you don’t use to something more memorable.
You get to choose what your keyboard modifiers do.
If you’re an accidental Caps Lock presser, you can disable that key to prevent yourself from accidentally turning it on as you type (Go to System Preferences > Keyboard & Mouse > Keyboard > Modifier Keys and set No Action For Caps Lock). In fact, you can disable or change the action of all the modifier keys--Control, Option, Command, and so on. If you’ve recently switched from a Windows PC to a Mac, you might want to disable the Control key, for example, until you get used to pressing Command instead--or you could change the Control key’s action to Command.