apple tale (50 Things Every Mac fans Should Know)
Like a champion cyclist knows bike parts,a car buff knows model years, and a sports fan knows win-loss records, all Mac geeks worth the title must know these things.

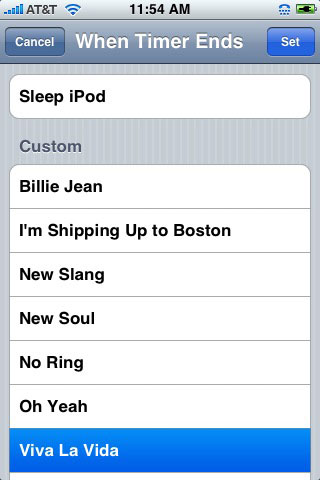
Set the iPhone’s timer for however long you think you’ll need to drift off to dreamland, then choose Sleep iPod as the timer action, instead of a ringtone.
Obviously, you won’t apply this tip if you’re driving. But if you’re taking a long plane, train, or car ride and want your iPod to play for a set time so you can take a snooze--without taxing the phone’s battery after you’re snoring away--you can use the phone’s timer so that your music plays until the timer is up. Tap the Clock icon on the Home screen, tap Timer, and then tap When Timer Ends to see your choices. The first item on the list is Sleep iPod. Tap Set. Also remember: The iPhone’s timer is truly handy...it can help you remember to switch your laundry, take a roast out of the oven, or anything else that you’d use a kitchen timer for.

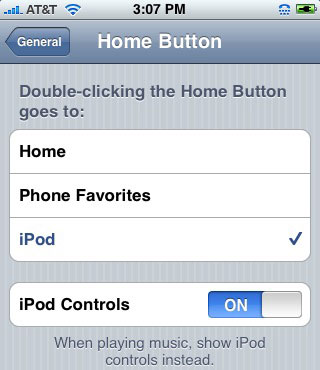
Tell your iPhone where you want to go with a double-press of the Home button.
It’s a wonder our iPhones’ Home buttons haven’t worn out from so much pressing--and here’s another trick that will get that button even more use: To set up your iPhone to go directly to a certain function menu with a double-press, tap Settings > General > Home Button. If you haven’t changed this setting, the default for a double-press on Home is to go to the Home screen, but you can change it to go to your iPhone Favorites or the iPod instead. You can also turn iPod Controls on or off here--If you select On, double-pressing Home while the iPod is playing media displays the iPod controls.

If you can’t get your machine to start at all—not even in Safe Mode—and you don’t have your system disk handy, you can start up in single-user mode and use fsck to set things right. fsck is a command-line utility similar to Disk Utility.
Reboot your Mac while holding down Command-S.
At the command-line prompt type: /sbin/fsck –fy. After fsck does its Unix magic you will see one of the following messages: ** The volume (name_of_volume) appears to be OK. If you see that, you’re golden. Or you might see: ***** FILE SYSTEM WAS MODIFIED *****. If you see that, you need to run fsck repeatedly until you see the first message.
When you’re finished, at the command-line prompt, type: reboot.
Your Mac will restart now.

Trouble starting up? If your Mac won’t start up, try using Safe Boot. Safe Boot loads your Mac into Safe Mode and runs a series of utilities during startup.
Start up in Safe Mode by holding down the Shift key when you start or restart. After you’ve started your machine successfully, restart the machine in normal mode. Safe Mode disables many OS X features and shouldn’t be used for anything other than troubleshooting.

Introduced in OS X Tiger, Automator is like a personal assistant for busy Mac users. The standalone app, found in the Applications folder, can light a fire under your productivity by, well, automating certain repetitive tasks in most Mac apps. One smart way to get started with Automator is to locate freeware and shareware Automator actions on the Internet and download them. Google automator actions or go to Apple’s site to download them at www.apple.com/downloads/macosx/automator/.
Now, if you want to start by creating a very simple Automator action, try this. It’s an action we use to resize multiple images for posting on the Web or emailing. This action uses a combination of tasks in Finder and Preview to open images you have selected in a Finder window, copy them to a folder called Scaled Images, leaving the originals untouched, scaling each image so it’s 480 pixels wide and saving each scaled image with "_scaled" added to the end of its filename. Here’s how to build this workflow in Automator.
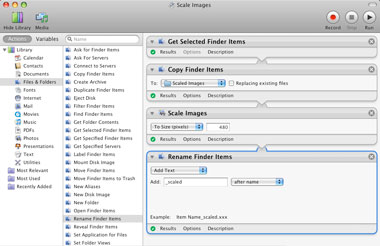
Sure, it’s only a four-step workflow, but our custom Scale Images action saves us hours every week.
1. Launch Automator. Select Files & Folders when asked to select a starting point to open a new workflow.
2. In the far left-hand (Actions) pane of the Automator window, under Library, select Files & Folders.
3. Select Get Selected Finder Items and drag it to the workflow area (where it says "Drag actions or files here to create your workflow"). This becomes Step 1 of your workflow.
4. Select Copy Finder Items from the right side of the Actions pane and drag it to the workflow area below step 1.
5. Since you want to copy the files as they are to a new folder on your Desktop called Scaled Images, under Copy Finder Items To, click the down arrow and select Other. Make sure Desktop is selected at the top of the Open dialog, click New Folder and create a folder called Scaled Images. Select that folder and click Open. Now step 2 in your workflow should say Copy Finder Items to Scaled Images.
6. Now is where the fun begins—can’t you feel it? On the left side of the Actions pane, select Photos, then look for the Preview icon on the right, followed by the words "Scale Images." Select this and drag it to the workflow pane as step 3 of your workflow.
7. On the left side of the Actions pane, select Files & Folders again and then drag Rename Finder Items to the bottom of the workflow pane. A dialog pops up warning you that this action will change the names of the Finder items passed into it (duh), but you don’t want two copies of each file, so click Don’t Add. Rename Finder Items becomes step 4 of your workflow, but you’re not quite finished.
8. To add "_scaled" to the end of each scaled image’s file name, click the down arrow next to Add Date or Time and select Add Text. In the add field type _scaled and keep "after name" selected to the right. Finally, to test the workflow, open a Finder window with some images in it, select them, and in Automator, click Run. If the workflow runs smoothly, you can save it for future use. The easiest way to save a new Automator action is to save it as an application: File > Save As > Application, then name it. For fastest access, we plopped our Scale Images action into the Dock. Now whenever we have a group of images to scale for posting online, we just select them in a Finder window and drag them to that icon in the Dock. Alternatively, you can also save the Automator action as a Finder plug-in, so it can be accessed by right-clicking on a selection. To do this, choose File > Save As Plug-in.

True Mac geeks rely on a cadre of third-party apps for customizing OS X and working smarter and faster. Here are our essentials, no matter what kind of Mac geek you are. In our case, we use them all.
FOR PRODUCTIVITY GEEKS: Quicksilver (free beta)
FOR AUDIO GEEKS: Audio Hijack Pro ($32)
FOR MENU GEEKS: FruitMenu ($12)
FOR ICON GEEKS: CandyBar ($29)
FOR BACKUP GEEKS: Déjà Vu ($24.95)
FOR CLEAN-DESKTOP GEEKS: DragThing ($29)

There are some things you just can’t take back, like spilling a mug of hot tea on your Mac’s keyboard. But even these kinds of disasters usually have straightforward solutions—as long as you keep your wits about you. In the case of a Mac keyboard or an iPhone taking a soaking, for example, fast, calm reaction is what will save your bacon. For solutions to these and 17 major Mac and iPhone/iPod disasters, see www.maclife.com/article/feature/how_survive_17_worst_mac_disasters.

If you get bored by Terminal Tetris, you can play Snake instead.
Execute this Terminal command: emacs
Press Return, then press Escape-X.
At the prompt type: Snake.
Press Return.
Your goal is to eat the red rectangles while avoiding the walls.