apple tale (50 Things Every Mac fans Should Know)
Like a champion cyclist knows bike parts,a car buff knows model years, and a sports fan knows win-loss records, all Mac geeks worth the title must know these things.

The Finder has a lot going for it, especially compared to Explorer in Windows. But we find Finder’s quick-and-dirty key commands the most useful, particularly Command-I, which, when pressed when a file or app in the Finder is highlighted, brings up the Inspector and shows you all the gory details, including the file or app’s type, size, where it’s saved on your hard drive, when it was created and last modified, and so on. If you’re looking at a list of files, you can also right-click the file name and choose Get Info. To bring up the Inspector in Quick Look, type Command-Option-I.

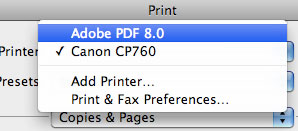
Acrobat Pro is a powerful tool, but you don’t need to spend $449 to own your own copy, since creating a PDF of any file is built right in to OS X.
Switchers will love this one: In OS X Leopard, making a PDF out of any document doesn’t require Adobe Acrobat. All you need to do is open the file you want to PDF and choose File > Print (or Command-P). In the printer field, click the up/down arrow to the right and select Adobe PDF.


A short, sweet dock is a beautiful thing. Note that your alias folder Dock item will take on the icon of the first item in the list, in our case, it’s Adium.
It’s best to leave applications in the Applications folder and generally use Mac OS X’s built-in organization, rather than moving apps around so you can open them from, say, your Desktop—that’s what the Dock’s for, after all. But you can still keep most-used apps and files accessible by creating a folder of aliases and stashing it in your Dock. On your Desktop, create a new folder by right-clicking and choosing New Folder, or by pressing Shift-Command-N. Give it a name; we’re calling ours Most Used. Go to the place on your hard drive where your frequently used apps and docs live. For apps, that’s obviously the Applications folder. Find your most-used apps in the list and right-click each, then select Make Alias. The alias will appear directly below the original app. Drag the alias from the Finder window to the alias folder you created on your desktop. Do the same with frequently used files. When you’re done, drag your aliases folder onto your Dock (to the right of the separator between app icons and the Trash). Now if you really want to get tricky, you can remove all of the duplicates in your Dock (by dragging each one off or right-clicking each one and choosing Remove from Dock), leaving just your alias folder and anything else that’s there by default (open apps most likely)—freeing up a nice chunk of Dock real estate (see also #20, "the Dock Is Cool, But It Ain’t Perfect," for more Dock customization tips).

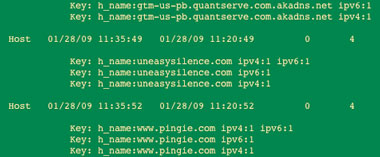
It looks like a bunch of gobbledygook to normal people, but your IT dude could find some dirty laundry lurking here, unless you purge Safari’s cache in the Terminal.
If you think that checking Private Browsing in Safari’s preferences actually keeps the websites you visit private, think again. Anyone--your boss or IT guy included--can see exactly where you’re surfing by executing the following Terminal command: dscacheutil -cachedump -entries Host
To purge Safari’s cache for real, execute this Terminal command: dscacheutil -flushcache

Other World Computing makes beefing up your Mac’s memory as easy as possible—just short of bringing you a cold beer after you’re done, to toast your Mac’s new memory bump. Most fairly recent Macs—except the MacBook Air, whose RAM is soldered to the motherboard—make it easy to add more RAM yourself. And OWC has how-to tutorials and videos to get you going—as well as some of the most affordable prices on Mac memory that we’ve found.
Here we present the steps for adding more RAM to an Intel Core 2 Duo MacBook Pro with only 2GB of RAM, but OWC sells RAM for many Mac models and provides DIY installation info, including video how-tos in some cases—on its site at www.macsales
.com/memory. There are also excellent DIY upgrade resources at www.everymac.com.
To install more RAM in an Intel Core 2 Duo MacBook Pro, you will need a #0 magnetized Phillips screwdriver, a non-marring work surface (spreading a clean towel on a desk or table works fine), and a tool called a spudger or, in Apple parlance, a "black stick"; these are available for $2.95 at iFixit. Most RAM installation manuals will tell you to also use an ESD wrist strap or mat to avoid damaging sensitive internal components with electrostatic charges, but you can touch any metal, grounded appliance while it’s plugged in to remove any static electricity in your fingers before getting started.
FOLLOW THESE STEPS:
Grab your specs. Those are some tiny screws.
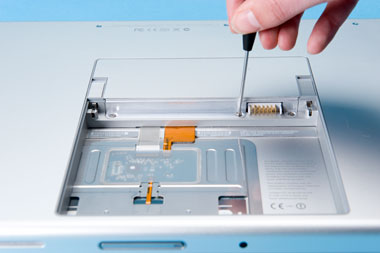
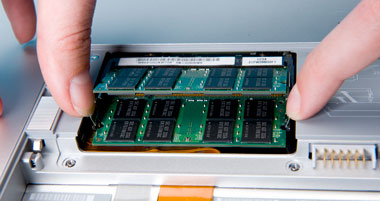
1. If you’ve used the notebook recently and it’s still warm, let it cool down before you get started. Remove the MacBook Pro’s battery and turn the machine over so the battery side is face up. Remove the three screws from the memory door.
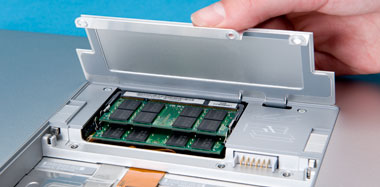
Here’s what RAM looks like.
2. Remove the memory door to expose the existing memory modules.
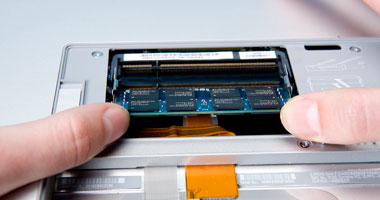
Use your thumbs to spread the tiny metal tabs to remove the RAM.
3. To remove each memory module, carefully spread the two locking tabs for the slot (top or bottom) away from the card on both sides and allow the card to pop up slightly.
4. Pull the card straight back and out of the memory slot
Slide the new RAM in until it clicks.
5. To install a memory card, insert the card at a 25-degree angle behind the locking tabs of the top slot. Firmly push the card straight into the slot until it is fully and securely seated along its length. If the back of the card drops down before it is fully seated, raise it up enough to push it fully into the slot.
NOTE: If installing two cards, install into the bottom slot first. When finished installing memory into the bottom slot, use your spudger, leveraged against the frame to push the back of the card toward the slot, to verify that the card is firmly seated. Align the notch in the memory card with the tooth in the slot before inserting.
6. When the card is fully seated, push it straight down until the tabs click onto both sides of the card, locking it into place.
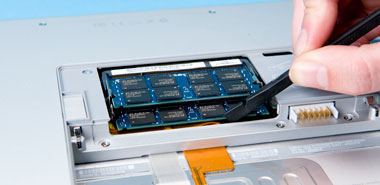
You’ll hear a click when you slide in the RAM, but use your black stick to be sure it’s in.
7. To ensure that the memory cards are seated securely, for the lower card, use a black stick leveraged against the frame to evenly push along the back of the card.