apple tale (50 Things Every Mac fans Should Know)
Like a champion cyclist knows bike parts,a car buff knows model years, and a sports fan knows win-loss records, all Mac geeks worth the title must know these things.

Sometimes it takes awhile for new podcasts to show up in the iTunes store. If you come across one you’d like to subscribe to, you can still subscribe even if it’s not yet on offer in the store. Copy the podcast feed to your clipboard (from a blog or whatever site you found it on). In iTunes, choose Advanced > Subscribe To Podcast, then paste in the podcast link.

You could use FileVault to store your top-secret data files, but there’s no need to bog down your system--FileVault is notoriously sluggish--when you can accomplish the same ends for specific files, such as tax returns, home-inventory lists, wedding vows, or anything else you want to keep under virtual lock and key. For these types of files, we like to create encrypted disk images (.dmg files), which is easy to do in Disk Utility.
1. Launch Disk Utility (/Applications/Utilities).
2. Choose File > New > Blank Disk Image and enter a name for your disk image in the Save As field. This name is used for the disk image (.dmg) file. Note the location specified in the Where pop-up menu. If you want to save the image file in a different location, change it.
3. Select a size for the image file from the Size pop-up menu. Choose a size appropriate for the disk’s needs. You can always create another one later if you need more space.
4. Choose 128-bit AES encryption from the Encryption drop-down.
5. Choose read/write disk image from the Image Format drop-down.
6. Click Create.
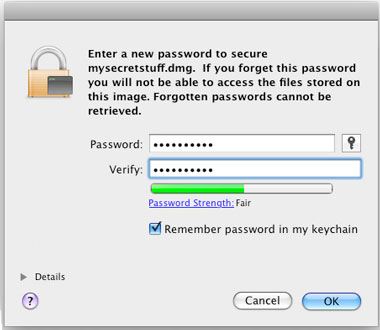
When you select a password for your disk image, Disk Utility tells you what it thinks of the password’s strength—that is, its crackability.
7. Enter and verify a good password in the dialog window that appears. This password will be saved in your Keychain by default, or you can deselect "Remember password (add to Keychain)" if you don’t want that.
8. Click OK.

Ever tried tapping "xoxo" to the end of a text to your BFF on the iPhone? You’ll notice the phone’s auto-correct feature selects "so" for the first "xo." To keep the iPhone from trying to auto-correct any word, just add an extra letter or two, so it looks like a word that doesn’t exist—this will, in most cases, confuse it to the point where it won’t try to guess what you’re trying to say. Of course, remember that this workaround does not help the iPhone "learn" words you use most, which is supposed to help you type faster.

Are you bugged by those bouncing Dock icons when an app wants to get your attention? You can Turn off that behavior for good with two simple Terminal commands:
defaults write com.apple.dock no-bouncing -bool TRUE
Press Return.
Type: killall Dock
If you don’t have an Intel Mac, you could also try Unsanity’s Dock Detox (free,).
And if you decide you want the bouncing back after you’ve run the above Terminal command, you can reverse it by executing: defaults write com.apple.dock no-bouncing -bool FALSE. Press Return. Type: killall Dock.
Filter any non-music items in your iTunes library by setting up a new music-only Smart Playlist.
If you’ve never played with Smart Playlists in iTunes, you’ll be delighted to discover that "smart" is no misnomer. Our two favorite ways to use Smart Playlists are for creating them on the fly just by clicking a few parameters. They save time by not forcing you to manually create playlists--and they let you filter out a variety of media that iTunes can track and keep updated, no matter how large your iTunes library gets.
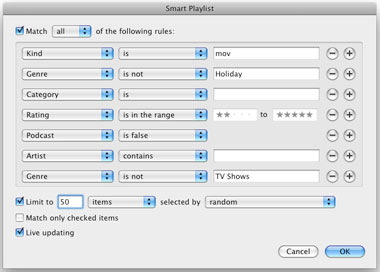
The smartest Smart Playlists of all is one that contains only music. We’re sure that there’s way more than music in your iTunes library, and if you listen to music wearing headphones throughout the workday, creating a music-only Smart Playlist saves you fiddling with iTunes when you should be, well, working.
Your ears will thank you for keeping the tunes fresh.
To create a music-only Smart Playlist, press Option-Command-N or go to File > New Smart Playlist. Check the box next to "Match the following rules." Now set up the "rules" governing your Smart Playlist by selecting a variety of characteristics that will filter just music into the playlist. For example, you want to eliminate podcasts, audiobooks, and movies, and you might even need to weed out a few specialized playlists or genres. After adding each new rule, click the plus symbol to add a new blank one. When you’re satisfied, check Live Updating, click OK, and name your new Smart Playlist in the sidebar.
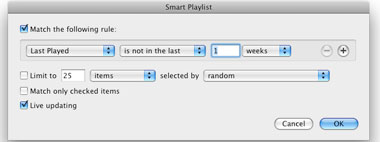
Another cool Smart Playlist helps you keep your music selection fresh. All you do is create a new Smart Playlist and next to Last Played, set it to "is not in the last 1 weeks."

iTunes is a smarter multitasker and media organizer than you might realize. It can help you manage all the PDFs on your Mac, with a few minutes of prep work on your part.
First, create a new iTunes library (launch iTunes while holding the Option key, then click Create Library) and get rid of all the music-related things. That includes deleting the default playlists iTunes creates and customizing the library display by removing the columns that are no longer pertinent. Just right-click in the column header and uncheck the label. Go to iTunes > Preferences and uncheck "Copy files to iTunes Music folder when adding to library" under the Advanced tab. That will leave the files where they are now rather than creating another copy of them in the ~/Music/iTunes/iTunes Music folder. While you’re at it, uncheck the display options under the General tab and check the Disable options under the Parental Control tab. That will eliminate the unnecessary options on the screen.
Now you’re ready to add PDF files to the library. Choose File > Add To Library, then Option-select your PDF files. Just like music tracks, they’ll show up in the iTunes library sorted alphabetically by name. It’s best to tag each file right when you add it to your Mac. One obvious way to tag a file is using the Genre column. Press Command-I (or right-click a file and select Get Info) and add your own description in the Genre field. We used the Genre field as a metatag ("Checks" or "Statements," for example) and put additional description in the Comment field. There are no limits on how to reassign the fields in the Get Info window.
Now you have to choose between Smart Playlists and user-defined playlists. If you add good metadata to each file, the Smart Playlist is the logical choice. If you don’t feel like adding a lot of tags to your files, then create your own playlists and manually add files.

If you’re in the habit of using acronyms and abbreviations in emails and text messages on the iPhone, you might have noticed that it’s a bit of a pain on the iPhone’s keyboard since Shift only activates caps on one letter, then switches off. The solution is to enable Caps Lock in your iPhone’s Settings (Settings > General > Keyboard > Enable Caps Lock). Now, when you’re in the keyboard, you can double-tap the Shift key, it will turn blue, and caps lock stays on until you tap the Shift key again to turn it off...you know, just FYI.

You can use the Terminal command SSH to open a secure connection to another Mac pretty easily. Best of all, via SSH, it’s free, whereas Apple charges $499 for Apple Remote Desktop, its desktop management app.
Please see Remote Desktop Software Comparison Chart first, It help you make a good buying decision when your’re thinking of purchasing/downloading remote desktop software.
First make sure that SSH log-ins are enabled on the remote Mac by opening System Preferences > Sharing. Check the box next to Remote Login, and the SSH service will activate.
To connect to that remote computer via SSH, open the Terminal on the local machine and execute this command: ssh -l username remote-address. Replace username with your username on the remote Mac and remote-address with the remote Mac’s IP address. (The remote IP address is listed in the remote machine’s Sharing pane when you click on Remote Login.) Press Return, and enter the remote username’s password at the prompt. SSH will connect you to the remote machine. (If you’re asked to add the remote machine to a list of known hosts, type Y for yes.)
Once you’re connected, you can execute any Terminal command remotely. Try this one, just for fun: say "Ouch. Don’t press the keys so hard." This is especially amusing if you’re executing the remote command on a Mac in a nearby room, so you can witness the user’s reaction to the Mac "talking."